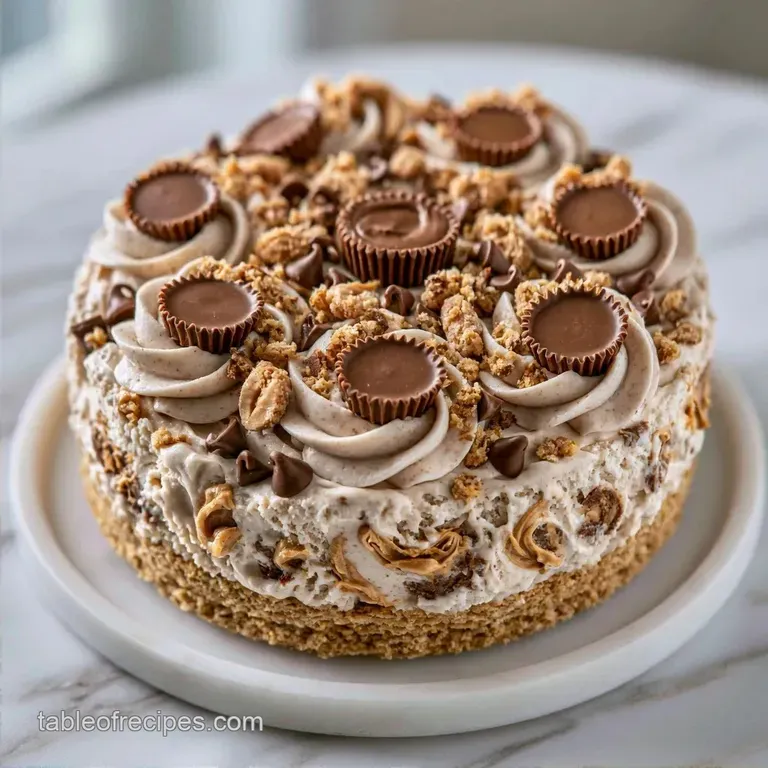
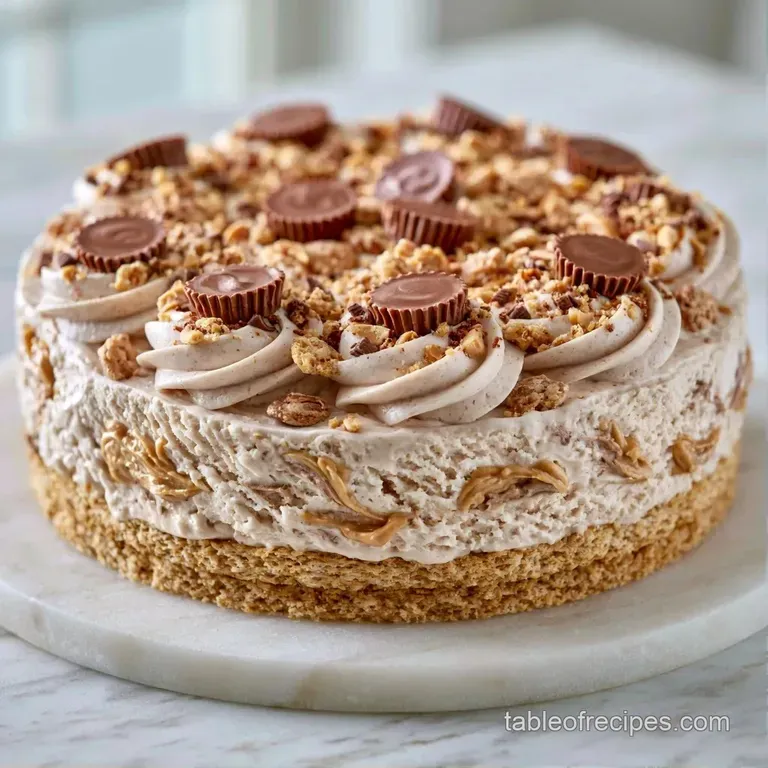
Homemade Peanut Butter Cup Ice Cream Cake
- Time: 30 min active + 6 hours chilling
- Flavor/Texture Hook: Salty peanut butter cream with a crisp, buttery base
- Perfect for: High calorie celebrations or a precise dessert project
- Logic Behind the Layers
- Required Ingredients and Swaps
- Necessary Kitchen Equipment
- Precise Assembly Instructions
- Solving Common Texture Issues
- Troubleshooting Common Issues
- Adjusting the Batch Size
- Debunking Frozen Dessert Myths
- Alternative Flavor Variations
- Freezer and Storage Guidelines
- Complementary Flavor Pairings
- Analysis of Texture Layers
- Recipe FAQs
- 📝 Recipe Card
Nothing ruins a frozen dessert like a base that turns into a mushy paste. Most people press their graham cracker crumbs into the pan and immediately pour in the cream, which allows moisture to migrate into the crust. This creates a soggy interface that compromises the structural integrity of the entire slice.
The fix is a precise thermal reset. By flash freezing the crust for exactly 10 minutes, you lock the fats in the butter, creating a moisture barrier. This ensures the base remains crisp against the creamy layers.
You can expect a dense, rich dessert with distinct layers. This Peanut Butter Cup Ice Cream Cake doesn't require a churn, as the chemical properties of the ingredients do the heavy lifting.
Logic Behind the Layers
The high sugar content in condensed milk lowers the freezing point, preventing large ice crystals from forming. This creates a smooth texture without requiring a churn.
Air Incorporation: Beating heavy cream creates a stable foam that provides the lift and lightness. Fat Stability: The peanut butter adds emulsifiers that keep the cream and condensed milk from separating during the freeze.
| Method | Time | Texture | Best For |
|---|---|---|---|
| Fast Freeze | 6.5 hours | Dense and creamy | Home kitchens |
| Traditional Churn | 24 hours | Airier and softer | Professional gear |
Ingredient Deep Dive
| Ingredient | What It Does | Best Swap |
|---|---|---|
| Heavy Cream | Provides structure and aeration | Full fat coconut cream |
| Condensed Milk | Lowers freezing point | Evaporated milk + sugar |
| Peanut Butter | Adds fat and flavor stability | Almond butter |
| Graham Crumbs | Creates a structural base | Biscoff cookie crumbs |
Required Ingredients and Swaps
For the buttery base: - 1.5 cups (180g) graham cracker crumbs Why this? Provides the necessary crunch and neutral flavor - 6 tbsp (85g) unsalted butter, melted Why this? Binds the crumbs into a solid sheet - 2 tbsp (25g) granulated sugar - 0.25 tsp (1.5g)
Salt
For the peanut butter ice cream layer: - 2 cups (480ml) heavy whipping cream, cold Why this? High fat content ensures a stable foam - 1 can (14 oz / 397g) sweetened condensed milk Why this? Prevents the cake from becoming a solid block of ice - 0.75 cup
(190g) creamy peanut butter Why this? Acts as the primary flavoring and emulsifier - 1 tsp (5ml) vanilla extract - 1 cup (150g) chopped peanut butter cups
For the chocolate ganache topping: - 8 oz (225g) semi sweet chocolate chips Why this? High cocoa butter content for a clean set - 0.5 cup (120ml) heavy cream - 0.5 cup (75g) chopped peanut butter cups
Necessary Kitchen Equipment
To maintain precision, avoid using plastic bowls for whipping cream, as they can retain residue that inhibits aeration. Use a stainless steel or glass bowl.
- 9 inch springform pan (essential for clean release)
- Parchment paper
- Electric hand mixer or stand mixer such as KitchenAid
- Rubber spatula for folding
- Medium mixing bowl
- Small saucepan for ganache
Precise Assembly Instructions
Phase 1: Building the Foundation
- Line the bottom of a 9 inch springform pan with parchment paper. Note: This prevents the crust from sticking to the base.
- Combine graham cracker crumbs, melted butter, sugar, and salt in a medium bowl. Stir until the mixture looks like wet sand.
- Press the mixture firmly into the bottom of the pan using the back of a spoon.
- Freeze for 10 minutes until the base is hard to the touch.
Phase 2: Creating the Cream
- Beat 2 cups of cold heavy whipping cream in a chilled bowl until stiff peaks form. Note: Do not overbeat or the cream will turn to butter.
- Whisk together the sweetened condensed milk, peanut butter, and vanilla extract until the mixture is completely smooth.
- Gently fold the whipped cream into the peanut butter mixture using a spatula.
- Fold in the 1 cup of chopped peanut butter cups.
- Pour the mixture over the chilled crust, smooth the top, and freeze for at least 4 hours.
Phase 3: The Decadent Finish
- Heat 0.5 cup of heavy cream in a saucepan until it just begins to simmer.
- Pour the hot cream over the chocolate chips and let sit for 5 minutes. Note: This allows the chocolate to melt without seizing.
- Whisk the chocolate and cream together until the ganache is smooth and glossy.
- Pour the warm ganache over the frozen ice cream layer.
- Sprinkle with the remaining chopped peanut butter cups.
- Freeze for another 2 hours before releasing the springform pan.
Solving Common Texture Issues
When the ganache breaks, it usually means the cream was boiled too aggressively or the chocolate was stirred too fast, introducing air. This results in a grainy texture rather than a mirror like finish.
Troubleshooting Common Issues
| Issue | Solution |
|---|---|
| Why Your Ganache Split | If the ganache looks curdled, the emulsion has failed. You can often fix this by adding a teaspoon of room temperature cream and whisking vigorously from the center outward. |
| Why Your Crust Is Soft | This happens when the butter isn't fully incorporated or the flash freeze step was skipped. The moisture from the ice cream layer seeps into the crumbs. |
| Why Your Cake Is Icy | Over beating the cream or using low-fat substitutes increases the water content. This allows large ice crystals to form, which creates a gritty mouthfeel. |
Adjusting the Batch Size
If you're scaling this recipe down to a 6 inch pan, reduce all ingredients by 50%. The freezing time for the main layer will decrease by about 20%, but I recommend sticking to the 4 hour window to ensure the core is fully set.
For larger batches (2x), do not simply double the salt and vanilla; increase them by 1.5x to avoid overpowering the peanut butter. When doubling the ganache, use a larger saucepan to ensure even heat distribution.
| Metric | Standard (9") | Half Batch (6") | Double Batch (12") |
|---|---|---|---|
| Prep Time | 30 minutes | 20 minutes | 45 minutes |
| Main Freeze | 4 hours | 3 hours | 6 hours |
| Total Time | 6 hrs 30 mins | 5 hrs 30 mins | 8 hrs |
Debunking Frozen Dessert Myths
Many believe you need an expensive ice cream maker to get a smooth texture. This is false. The use of sweetened condensed milk provides enough dissolved solids to prevent ice crystal growth.
Another common myth is that you should "warm up" the cake for 30 minutes before serving. This actually causes the outer edges to melt while the center remains frozen, ruining the structural integrity. Instead, dip your knife in hot water for every single slice.
Alternative Flavor Variations
If you prefer a different candy profile, my Butterfinger cake recipe uses a similar base but changes the mix ins. For a crunchier texture, you might enjoy an Oreo sandwich cake.
For a salty sweet twist: Add a pinch of Maldon sea salt to the ganache right before pouring it over the cake.
For a "Dairy Queen" style experience: Add a layer of frozen chocolate fudge ripple between the crust and the peanut butter cream.
To reduce the sugar: Replace the granulated sugar in the crust with a monk fruit sweetener, though the condensed milk is non negotiable for the texture.
Freezer and Storage Guidelines
This cake stays stable in the freezer for up to 2 months. Wrap it tightly in plastic wrap and then a layer of aluminum foil to prevent freezer burn. The fats in the peanut butter help protect the cake from absorbing odors from other frozen foods.
Reheating/Serving: Do not reheat. Let the cake sit at room temperature for exactly 5 minutes before slicing. This allows the ganache to soften slightly while the ice cream remains firm.
Zero Waste: If you have leftover graham cracker crumbs, mix them with melted butter and a bit of cinnamon to make a quick crumble topping for yogurt or oatmeal.
Complementary Flavor Pairings
The intensity of the peanut butter and chocolate requires a palate cleanser. I recommend serving this with a side of fresh raspberries or sliced Granny Smith apples. The acidity cuts through the heavy fats.
For drinks, a bitter espresso or a cold brew coffee balances the sugar levels. If you're pairing it with a dessert wine, a chilled Tawny Port works well due to its nutty notes.
Analysis of Texture Layers
The success of this Peanut Butter Cup Ice Cream Cake depends on the contrast between three distinct states of matter: the crisp, sandy crust, the aerated semi solid cream, and the dense, fudgy ganache.
The crust provides the necessary resistance to the tooth, preventing the dessert from feeling like a bowl of soft serve. The middle layer uses the peanut butter as a stabilizer, creating a rich mouthfeel that lingers. Finally, the ganache adds a snap when chilled, which breaks away to reveal the softer interior.
This strategic layering is what prevents the dessert from feeling one dimensional.
Chef's Note: For the cleanest slices, use a thin bladed knife. Wipe the blade clean with a warm, damp cloth between every cut to prevent streaks of chocolate from smearing into the peanut butter layer.
Recipe FAQs
How to assemble this Peanut Butter Cup Ice Cream Cake?
Line a 9 inch springform pan with parchment paper. Press the graham cracker crust into the bottom, freeze for 10 minutes, then layer the peanut butter cream mixture and freeze for 4 hours before adding the ganache.
How to fix a ganache that has split?
Whisk a teaspoon of room temperature cream into the mixture. Stir vigorously from the center outward to re-emulsify the chocolate and cream.
Why is my ice cream cake crust soft?
The butter may not be fully incorporated or the flash freeze was skipped. This allows moisture from the cream layer to seep into the graham cracker crumbs.
Why does my cake have an icy texture?
Over beating the heavy whipping cream often causes this. Too much air or using low-fat substitutes increases water content, which forms large ice crystals.
Can I use different candies instead of peanut butter cups?
Yes, you can swap them for other candy bars. If you enjoy this dessert style, you can apply the same assembly logic to a Butterfinger cake.
Is it true that freezing the crust is optional?
No, this is a common misconception. Skipping the 10-minute flash freeze results in a soggy base as the cream layer penetrates the crust.
How to get clean slices when serving?
Dip a sharp knife in hot water between each cut. Wipe the blade clean before the next slice to ensure smooth, professional edges.
Peanut Butter Cup Ice Cream Cake

