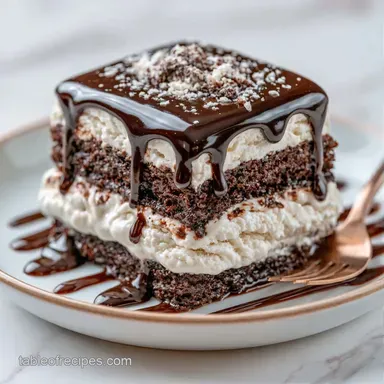
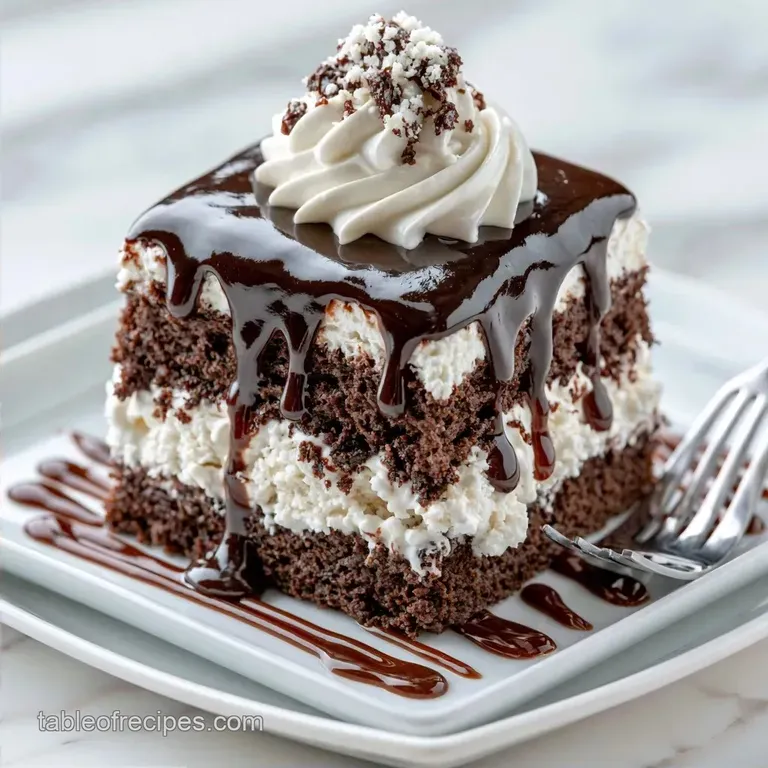
Hot Fudge Chocolate Ice Cream Cake: Freezer-Friendly
- Time: 30 min active + 6 hrs chilling
- Flavor/Texture Hook: Deep cocoa bitterness balanced by creamy vanilla and chewy marshmallows
- Perfect for: Large birthday parties or chocolate heavy dessert tables
Hot Fudge Chocolate Ice Cream Cake Guide
That distinct click of a springform pan releasing is the best part of this process. I remember the first time I tried making a frozen cake without a precise plan. The cake base turned into a brick, and the fudge froze into a hard sheet that cracked like glass when the knife hit it.
It was a mess, but it taught me that temperature and acidity are everything when you're dealing with frozen desserts.
The goal here is a specific contrast. You want a cake base that stays moist at sub zero temperatures and a fudge that remains glossy and pourable. This Hot Fudge Chocolate Ice Cream Cake achieves that by using a chemical reaction between vinegar and baking soda, which keeps the crumb open and soft.
You can expect a dessert that looks professional but uses a very straightforward assembly method. It's all about the timing of the layers. If the fudge is too hot, the ice cream melts. If it's too cold, it won't spread. We'll hit that window exactly.
Why This Cake Works
- Vinegar and Soda: The acidity of the distilled white vinegar reacts with the baking soda to create carbon dioxide bubbles. This ensures the cake stays light and doesn't become dense when frozen.
- Corn Syrup: Adding a small amount of corn syrup to the fudge prevents the sugar from crystallizing. This keeps the fudge smooth and prevents it from turning into a hard candy layer in the freezer.
- Fat Distribution: The vegetable oil in the cake provides a more consistent moisture level than butter would, as oil remains liquid at lower temperatures.
| Method | Prep Time | Texture | Best For |
|---|---|---|---|
| Fast (store-bought fudge) | 15 mins | Sweeter, denser | Last minute cravings |
| Precision (Homemade) | 30 mins | Balanced, glossy | Special occasions |
Essential Ingredient Roles
| Ingredient | What It Does | Best Swap |
|---|---|---|
| Cocoa Powder | Provides the structural chocolate flavor | Dutch process cocoa (richer) |
| Heavy Cream | Emulsifies the fudge for stability | Full fat coconut milk (adds nuttiness) |
| Corn Syrup | Prevents sugar crystallization | Honey (changes flavor profile) |
| Vanilla Bean Ice Cream | Provides the creamy thermal mass | Chocolate ice cream (more intense) |
Necessary Kitchen Tools
You'll need a 9 inch springform pan. This is non negotiable because you cannot flip an ice cream cake out of a standard cake pan without destroying the layers. Parchment paper for the bottom is also a must to ensure the base releases without sticking.
For the fudge, a medium saucepan and a whisk are your main tools. A silicone spatula helps in smoothing the ice cream and fudge layers without creating air pockets. If you have a digital thermometer, use it to ensure the fudge is around 110°F before pouring it over the ice cream.
Assembly and Baking Steps
Phase 1: Baking the Foundation
- Preheat oven to 350°F (175°C). Grease a 9 inch springform pan and line the bottom with parchment paper.
- Whisk together 1.5 cups all purpose flour, 1 cup granulated sugar, 1/3 cup unsweetened cocoa powder, 1 tsp baking soda, and 1/2 tsp salt in a large bowl.
- Stir in 1 cup warm water, 1/3 cup vegetable oil, 1 tsp vanilla extract, and 1 tsp distilled white vinegar until the batter is smooth.
- Pour the batter into the pan and bake for 25-30 minutes until a toothpick comes out clean.
- Allow the cake to cool completely in the pan. Note: Baking the cake while the pan is cold can lead to uneven rising.
Phase 2: Crafting the Molten Fudge
- Melt 1/2 cup unsalted butter in a saucepan over medium heat. Whisk in 2/3 cup cocoa powder and 1 cup granulated sugar until combined.
- Gradually stir in 1 cup heavy cream, 1/4 tsp salt, and 2 tbsp corn syrup.
- Simmer on low for 3-5 minutes until the mixture is glossy and bubbles slowly.
Phase 3: The Layering Process
- Spread a portion of the hot fudge over the cooled cake base.
- Layer 1 quart of slightly softened vanilla bean ice cream over the fudge and smooth the top. Note: Let the ice cream sit on the counter for 5-10 mins first.
- Fold in 1 cup mini marshmallows if desired, then top with the reserved 1/2 cup hot fudge.
- Chill in the freezer for at least 6 hours or overnight before slicing.
Chef's Note: To get clean slices, dip your knife in hot water and wipe it dry between every single cut. This prevents the ice cream from dragging into the cake layer.
Troubleshooting Cake Issues

If you find your cake isn't behaving, it usually comes down to temperature management. The most common issue is the "slumping" effect, where the ice cream melts into the cake, creating a soggy mess. This happens when the fudge is poured while still boiling.
Why Your Fudge Is Grainy
This usually happens if the sugar wasn't fully dissolved or if the mixture was boiled too aggressively. According to the guidelines at King Arthur Baking, maintaining a gentle simmer is key to keeping sugar solutions stable.
Why Your Cake Is Hard
If the cake base feels like a frozen puck, you might have overbaked it. The moisture in the cake is what prevents it from freezing solid.
| Problem | Root Cause | Solution |
|---|---|---|
| Ice cream melting | Fudge too hot | Cool fudge to 110°F before layering |
| Cake base sticking | No parchment paper | Use a thin knife to loosen edges |
| Fudge separating | Over boiling cream | Whisk vigorously over low heat |
Flavor Variations and Subs
If you want to pivot the flavor profile, you can easily adjust the core components. For those who love a saltier contrast, try my PB Chocolate Ice Cream Cake which uses a similar base but incorporates nutty fats.
Decision Shortcut: If you want a crunchier texture, fold in crushed pretzels with the marshmallows. If you want a lighter taste, swap vanilla ice cream for a raspberry sherbet. If you prefer a denser base, replace the warm water in the cake with brewed coffee.
| Original Ingredient | Substitute | Why It Works |
|---|---|---|
| All purpose flour | Almond flour (1:1) | Grain free option. Note: Result is denser and more fragile |
| Granulated sugar | Coconut sugar | Earthier taste. Note: Cake will be darker brown |
| Heavy cream | Evaporated milk | Lighter fat content. Note: Fudge will be less glossy |
Adjustment Guidelines
When changing the size of this Hot Fudge Chocolate Ice Cream Cake, remember that volume increases faster than surface area.
Scaling Down (1/2 batch): Use a 6 inch springform pan. Reduce the baking time by about 20%, checking at 20 minutes. If the recipe calls for an odd number of eggs (not applicable here, but good for others), beat one and use half.
Scaling Up (2x batch): Work in batches for the fudge to ensure the emulsion doesn't break. For the cake, use two 9 inch pans rather than one deep pan. If you must use a deeper pan, lower the oven temp to 325°F (160°C) and extend the baking time by 10-15 minutes to ensure the center cooks without burning the edges.
Cake Myths
Myth: You must use a blowtorch for the fudge. Some people think you need to caramelize the fudge on top. You don't. The corn syrup and heavy cream provide enough gloss and stability for a traditional frozen finish.
Myth: Ice cream cakes must be frozen for 24 hours. Six hours is sufficient for the thermal mass of the ice cream to stabilize. Any longer and the cake base may actually start to lose moisture and become too firm.
Storage and Waste Tips
Store this cake in the freezer in its springform pan, covered tightly with plastic wrap to prevent freezer burn. It stays fresh for up to 2 months. If you remove it from the pan, wrap it in foil and then plastic wrap.
To reheat or temper the cake, let it sit at room temperature for 10-15 minutes before serving. This allows the fudge to soften and the cake base to regain its moist texture.
For zero waste, if you have leftover fudge, freeze it in ice cube trays. You can pop these fudge cubes into a hot cup of milk for a quick homemade hot chocolate. If you have leftover cake scraps, crumble them over a bowl of vanilla ice cream for a "deconstructed" version of this recipe.
Best Pairing Ideas
This dessert is quite rich, so you need something to cut through the fat. A sharp, tart accompaniment works best. I usually suggest fresh raspberries or a tart cherry compote.
If you're serving this at a party, offer a side of fresh whipped cream. The lightness of the cream balances the density of the hot fudge. For another option, you might enjoy an Oreo Ice Cream Sandwich Cake if you're looking for something with a bit more crunch.
For a drink pairing, a strong espresso or a cold brew coffee is the gold standard. The bitterness of the coffee cleanses the palate between bites of the sugary fudge and creamy vanilla.
Recipe FAQs
How to make this chocolate ice cream cake?
Bake a chocolate cake at 350°F, cool it, and layer with homemade hot fudge and vanilla bean ice cream. Freeze the assembled cake for at least 6 hours before slicing into 12 pieces.
Why did my ice cream cake slump or become soggy?
You likely poured the hot fudge while it was still boiling. This causes the ice cream to melt prematurely into the cake base.
How long should the cake freeze before serving?
Freeze for at least 6 hours or overnight. This ensures the layers are fully set for clean slicing.
Is it true that the cake base needs to be hot when adding fudge?
No, this is a common misconception. The cake must cool completely in the pan first to prevent the fudge and ice cream from melting into the sponge.
How to store the cake to prevent freezer burn?
Keep it in the springform pan covered tightly with plastic wrap. If you remove it from the pan, wrap it in foil followed by a layer of plastic wrap.
How to serve the cake so it is easier to slice?
Let the cake sit at room temperature for 10-15 minutes before cutting. This tempers the fudge and cake base for a moister texture.
Can I use a different pan if I don't have a springform?
Yes, a standard 9 inch cake pan works. Line the bottom with parchment paper for easier removal, a technique we also use for our no bake ice cream cake.
Hot Fudge Chocolate Ice Cream Cake