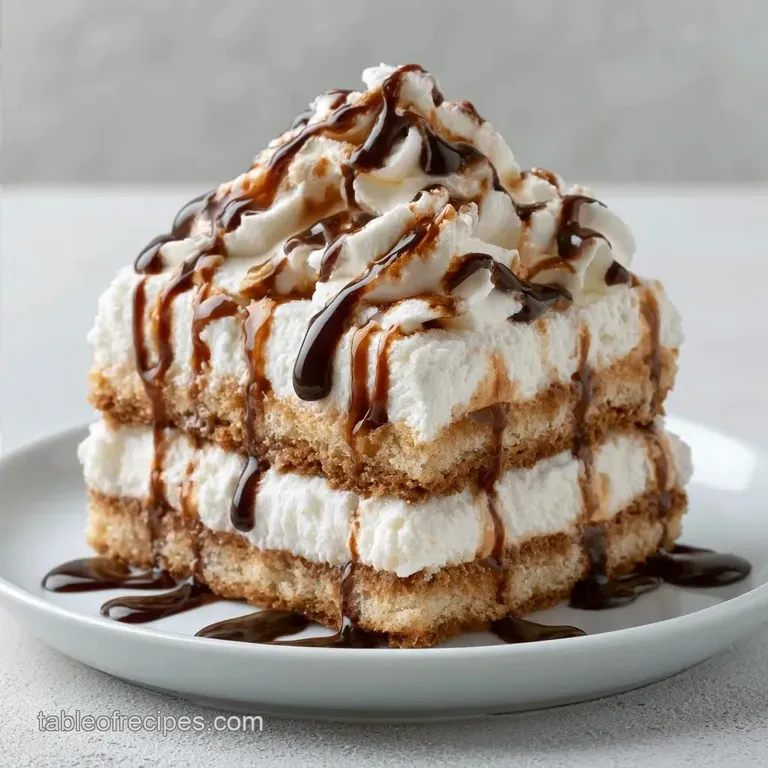
Whipped Cream Ice Cream Sandwich Cake with Chocolate Syrup
- Time:15 minutes active + 6 hours chilling
- Flavor/Texture Hook: Airy cream meets chewy frozen cookies
- Perfect for: Summer parties or a crowd-pleasing dessert
The sound of a serrated knife cracking through a frozen chocolate cookie is a specific kind of satisfaction. Have you ever wondered why some ice cream cakes feel like eating a block of ice, while others feel like a cloud?
Most store-bought versions rely on stabilizers and hydrogenated fats to keep their shape, which often leaves a waxy film on the roof of your mouth.
I wanted to remove that guesswork and see if real, fresh cream could hold up against the weight of ice cream sandwiches. It turns out that the physics of air bubbles in heavy cream provides enough structure to create a light, airy layer that doesn't freeze solid.
This Whipped Cream Ice Cream Sandwich Cake is a study in temperature and texture. By layering frozen components with a stable foam, you get a dessert that slices cleanly but melts instantly on the tongue.
Whipped Cream Ice Cream Sandwich Cake
Why the Cream Stays Fluffy - Air Incorporation: Beating heavy cream traps tiny air bubbles in a network of fat, which prevents the layer from becoming a solid block of ice.
- Sugar Stability: Powdered sugar contains a small amount of cornstarch that helps bind the moisture, keeping the cream from weeping.
If you're looking for something slightly different, a no bake ice cream cake uses a similar logic but a different base.
| Feature | Fresh Whipped Cream | store-bought Topping | Impact |
|---|---|---|---|
| Taste | Clean, milky | Overly sweet, artificial | Fresh is more balanced |
| Texture | Airy and light | Dense and oily | Fresh melts faster |
| Stability | Needs chilling | Room temp stable | Fresh requires a freezer |
Recipe Specs
The precision here is in the timing and the temperature. To get a clean slice, the cake must hit a specific thermal equilibrium.
- Prep time:15 minutes
- Cook time:0 minutes
- Total time:6 hours 15 mins
- Yield: 16 pieces
What You'll Need
For the Cake Base
- 15 standard size ice cream sandwiches Why this? Provides the structural walls and sweetness
- 1/2 cup chocolate syrup Why this? Adds a thin moisture barrier and depth
For the Real Whipped Cream
- 2 cups heavy whipping cream, cold Why this? High fat content (36%+) is required for stiff peaks
- 1/2 cup powdered sugar, sifted Why this? Dissolves faster than granulated sugar
- 1 tsp pure vanilla extract Why this? Balances the richness of the dairy
For the Topping
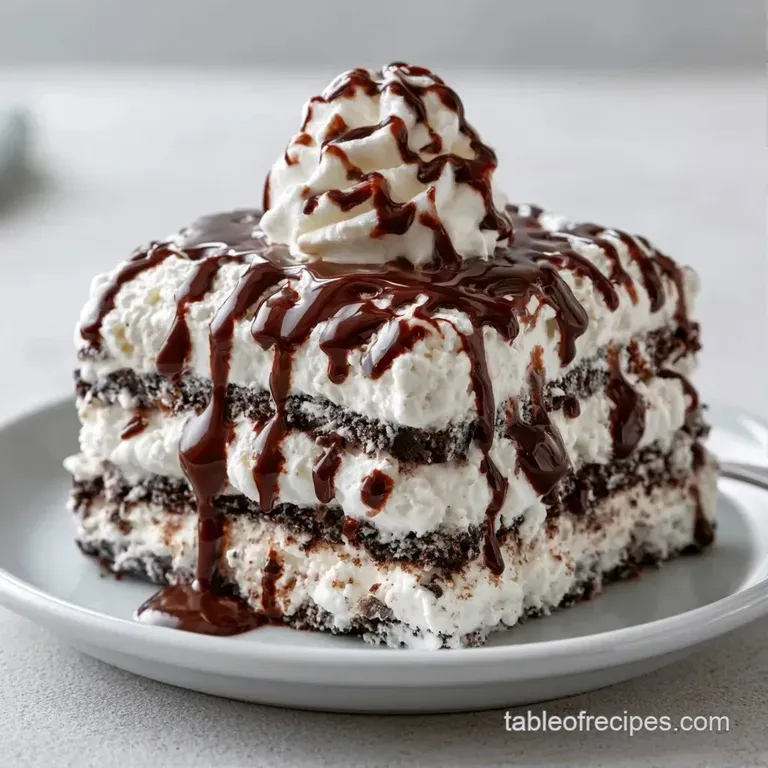
- 1/4 cup chocolate shavings Why this? Adds a tactile snap to the soft top
Ingredient Substitutions
| Original Ingredient | Substitute | Why It Works |
|---|---|---|
| Heavy Cream | Chilled Coconut Cream | Similar fat levels. Note: Adds a tropical flavor |
| Powdered Sugar | Icing Sugar | Identical composition |
| Chocolate Syrup | Melted Dark Chocolate | Richer flavor. Note: Must be lukewarm to avoid melting cream |
Equipment Needed
To remove the guesswork, use an 8x8 inch square baking pan. Using a larger pan will leave you short on ice cream sandwiches, and a smaller one will make the layers too thick to slice easily.
You'll also need a stand mixer such as KitchenAid or a hand mixer, a chilled metal bowl, and a serrated knife for trimming the cookies.
The Assembly Process
Phase 1: Preparing the Foundation
- Line an 8x8 inch square baking pan with parchment paper, leaving an overhang on the sides for easy removal.
- Arrange a single layer of ice cream sandwiches side by-side at the bottom of the pan.
- Trim edges with a serrated knife until the base is flush and gap free. Note: This ensures the cake doesn't lean when sliced
Phase 2: Creating the Stable Cream
- Pour cold heavy cream, powdered sugar, and vanilla into a chilled mixing bowl.
- Beat on medium high speed until stiff peaks form and the cream holds its shape firmly. Note: Stop immediately once peaks stand straight; over beating creates butter
Phase 3: The Layering Sequence
- Spread half of the whipped cream over the first layer of ice cream sandwiches until the surface is smooth.
- Drizzle a thin layer of chocolate syrup over the cream.
- Place a second layer of ice cream sandwiches on top, pressing down gently.
Phase 4: The Deep Freeze
- Cover the top and sides of the cake with the remaining whipped cream, smoothing the edges with a spatula.
- Garnish with chocolate shavings and chill for 6 hours until the structure is firm.
Chef's Note: If your kitchen is warm, put your mixing bowl and beaters in the freezer for 10 minutes before whipping. This keeps the fat globules stable and helps you reach stiff peaks faster.
Fixing Common Problems
The most frequent issues with this Sandwich Cake involve temperature control. Because you are working with frozen and room temperature elements, the window for assembly is narrow.
The Cream Turned to Butter
This happens when you over incorporate air and the fat solids clump together. If the cream looks grainy, you've gone too far. You can sometimes save it by gently folding in a tablespoon of liquid cream by hand.
The Cake is Too Hard to Slice
If the freezer is set to a very low temperature, the cookies can become rock hard. Let the cake sit on the counter for 5 minutes before cutting. This allows the edges to soften slightly for a cleaner break.
Layers are Sliding
Sliding usually occurs if the whipped cream wasn't beaten to stiff peaks or if the ice cream sandwiches were too soft during assembly.
Quick Fix Guide
| Problem | Root Cause | Solution |
|---|---|---|
| Grainy Cream | Over beating | Fold in 1 tbsp liquid cream |
| Slipping Layers | Cream too soft | Ensure stiff peaks before spreading |
| Cracking Cookies | Too frozen | Let sit 5 mins before slicing |
Creative Flavor Variations
You can easily modify the profile of this recipe by changing the ice cream sandwiches. If you use mint chocolate chip sandwiches, swap the vanilla extract for a drop of peppermint oil.
For a different take on frozen layers, you might enjoy this ice cream sandwich dessert which uses a slightly different layering approach.
Flavor Tweaks - Berry Blast: Fold 1/4 cup of smashed raspberries into the whipped cream. - Coffee Crunch: Add 1 tsp of instant espresso powder to the powdered sugar.
Diet Swaps - dairy free: Use vegan ice cream sandwiches and heavy coconut cream. - Lower Sugar: Use a monk fruit based powdered sweetener.
Decision Shortcut
- If you want a richer taste, use dark chocolate shavings.
- If you want a lighter feel, increase the whipping time for more air.
- If you are serving a crowd, slice into 2 inch squares.
Storage and Waste
This dessert lives in the freezer. It stays fresh for up to 2 weeks, though the whipped cream can start to pick up "freezer smells" if not sealed tightly. Wrap the pan in plastic wrap or move the cake to an airtight container.
To reheat or soften, do not use a microwave. Simply let it temper at room temperature for a few minutes.
For zero waste, any leftover whipped cream can be dolloped onto fresh berries or used as a topping for coffee. If you have broken pieces of ice cream sandwiches, crumble them into a bowl and pour warm chocolate syrup over them for a quick snack.
Plating and Serving
To get those professional looking squares, dip your knife in hot water and wipe it dry between every single cut. This prevents the cream from smearing into the chocolate layers.
According to Serious Eats, temperature control is the most important factor in dessert stability. Serve the cake on a chilled platter to prevent the bottom layer from melting too quickly.
For a final touch, add a single fresh raspberry or a mint leaf to the top of each slice. The acidity of the berry cuts through the richness of the cream and chocolate.
Recipe FAQs
How to assemble the ice cream sandwich cake?
Line an 8x8 inch pan with parchment paper. Arrange a layer of ice cream sandwiches at the bottom, spread half the whipped cream and chocolate syrup, then add a second layer of sandwiches and top with the remaining cream.
How long should the cake chill before serving?
Chill for at least 6 hours. This ensures the layers set firmly, which prevents the cake from collapsing when you slice it.
Is it true that this cake requires baking in an oven?
No, this is a common misconception. This is a no-bake dessert that relies entirely on freezing to maintain its structure.
How to store the cake to avoid freezer odors?
Wrap the pan in plastic wrap or move it to an airtight container. This prevents the whipped cream from absorbing smells from other frozen foods.
How to soften the cake for easier slicing?
Let it temper at room temperature for a few minutes. Avoid using a microwave, as this will melt the ice cream layers unevenly.
Is an ice cream sandwich cake considered a real cake?
Yes, it is a frozen dessert cake. While it uses pre-made sandwiches instead of a baked sponge, it follows a traditional layered structure. If you prefer a different filling style, try the pudding based version.
How to ensure the whipped cream remains stable?
Beat cold heavy cream, powdered sugar, and vanilla on medium high speed until stiff peaks form. Using a chilled mixing bowl helps the cream hold its shape firmly.
Whipped Cream Ice Cream Sandwich Cake

