Homemade Oreo Ice Cream Cake: Shattering Crust
- Time: 20 min active + 6 hours chilling
- Flavor/Texture Hook: Shattering chocolate crust with aerated cream
- Perfect for: Birthday parties or high reward low effort desserts
The sound of a store-bought ice cream cake slicing is usually a dull thud. You get a soggy, preservative heavy crust and a filling that feels more like frozen syrup than actual cream. It is a disappointing experience for something that costs twenty dollars.
I wanted something that actually snapped when the fork hit the base. The goal was a structural foundation that stays crisp despite being pressed against frozen cream for hours. This Oreo No Bake Ice Cream Cake removes the guesswork by focusing on the physics of the crust and the temperature of the cream.
You can expect a dessert that looks professional but requires zero actual cooking. We are focusing on precision and temperature control here. When the ratios are right, you get a clean slice and a texture that doesn't vanish instantly on the tongue.
Oreo No Bake Ice Cream Cake
The key to this recipe is managing the water content in the filling and the fat barrier in the base. If you just mix ice cream and cookies, you often end up with a block of ice that is too hard to cut.
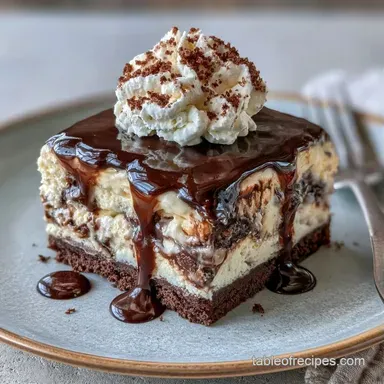
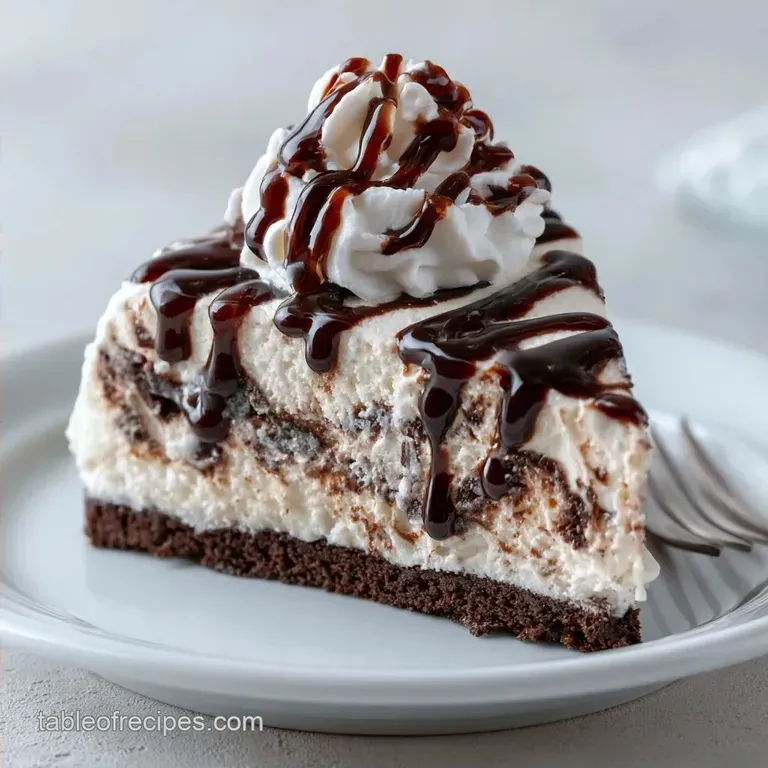
Hydrophobic Base: Using melted butter to coat the cookie crumbs creates a fat barrier. This prevents the moisture from the ice cream from soaking into the crust, which keeps it from getting mushy.
Air Integration: Folding whipped cream into the ice cream introduces tiny air pockets. This changes the density of the cake, making it easier to scoop and slice without needing a heated knife.
Recipe Specifications
To get the results I'm talking about, you need to hit specific numeric checkpoints. This isn't a "handful of this" kind of recipe.
First, the base requires exactly 340g of processed cookies. Too few, and the crust crumbles. Second, the crust must freeze for 15 minutes before the filling goes on. This locks the butter into a solid state.
Finally, the entire cake needs a minimum of 6 hours in the freezer to reach the correct structural integrity for slicing.
Since we are skipping the heat, we can compare the cold assembly method to traditional baked crusts.
| Method | Crust Texture | Effort |
|---|---|---|
| Cold Assembly | Shattering and dense | Low (No oven) |
| Oven Baked | Flaky and airy | Medium (Requires cooling) |
Shopping List Breakdown
The quality of the vanilla ice cream determines the final mouthfeel. I recommend a premium brand with a high butterfat content to ensure the cake doesn't develop ice crystals.
- Vanilla Ice Cream
- Provides the bulk and sweetness. Use a full fat version for the best stability.
- Heavy Whipping Cream
- Adds the air needed for a light texture.
- Oreo Cookies
- Used for the base, the mix ins, and the garnish.
- Unsalted Butter
- Acts as the binder and moisture barrier for the crust.
- Hot Fudge Sauce
- Provides a rich, gooey contrast to the cold cream.
- Whipped Topping
- Used for a stable, decorative finish.
| Original Ingredient | Substitute | Why It Works |
|---|---|---|
| Heavy Cream (1 cup) | Mascarpone (softened) | Higher fat content. Note: Result is denser and less airy |
| Unsalted Butter | Coconut Oil (refined) | Similar fat properties. Note: Adds a slight tropical hint |
| Hot Fudge Sauce | Melted Dark Chocolate | Intense cocoa flavor. Note: Hardens faster in the freezer |
Equipment Needed
You don't need a professional kitchen, but a few specific tools make this a lot easier.
- 9 inch springform pan (this is non negotiable for clean removal)
- Food processor (for a uniform, sandy crumb)
- Rubber spatula (for folding without deflating the air)
- Offset spatula (to get that smooth, flat top)
- Electric hand mixer or stand mixer such as KitchenAid
- Flat bottomed glass (to pack the crust)
Bringing It Together

Phase 1: Building the Foundation
- Process 24 Oreo cookies (340g) in a food processor until they reach a fine, sandy texture.
- Stir in the melted butter (85g) until the mixture resembles wet sand.
- Firmly pack the mixture into the bottom of a 9 inch springform pan using a flat glass to ensure the crust is level and tightly compressed.
- Freeze the crust for 15 minutes to lock in the structure.
Phase 2: Creating the Filling
- Beat the heavy whipping cream (240ml) until stiff peaks form.
- Allow vanilla ice cream (1.4L) to sit at room temperature for 10-15 minutes until pliable but not melted.
- Gently fold the whipped cream into the softened ice cream using a rubber spatula. Note: Do not stir vigorously or you'll lose the air.
- Fold in the coarsely chopped Oreos (170g), keeping the chunks intact for texture.
Phase 3: The Final Set
- Spread the ice cream mixture evenly over the frozen crust and smooth the top with an offset spatula.
- Freeze the cake for a minimum of 6 hours.
- Spread the slightly warmed hot fudge sauce (125ml) over the top of the frozen cake.
- Top with whipped cream (240ml) and garnish with crushed Oreos (55g).
Pro Tips & Pitfalls
One mistake I once made was adding the hot fudge while it was too warm. It melted the top layer of ice cream instantly, creating a soupy mess. Make sure the fudge is just barely warm to the touch.
If you want a different style of dessert, you might enjoy an Oreo ice cream sandwich cake for something more layered. For a richer chocolate hit, a hot fudge ice cream cake is a great alternative.
Avoiding Hard Cake
If the cake feels like a brick, don't force the knife through. Let it sit on the counter for 5-10 minutes. This softens the edges and prevents the crust from cracking under pressure.
Preventing Crust Crumbling
Under pressing the crust is the most common failure. Use a heavy glass and press with your full weight. If the crumbs aren't tightly bonded, the slice will fall apart the moment you lift it.
| Problem | Root Cause | Solution |
|---|---|---|
| Soggy Base | Too little butter | Increase butter by 1 tbsp per 24 cookies |
| Icy Texture | Ice cream melted then refroze | Fold cream quickly and freeze immediately |
| Cracked Top | Sliced while too frozen | Temper at room temp for 8 minutes |
How to Serve and Enjoy
For the cleanest slices, dip your knife in hot water and wipe it dry between every single cut. This melts a microscopic layer of the cake, allowing the blade to glide through without dragging the filling.
Goal | What to change
|---|---| | More Crunch | Add an extra 50g of chopped Oreos to the filling | | Lighter Taste | Swap the whipped topping for fresh whipped cream | | Richer Topping | Mix a pinch of espresso powder into the hot fudge |
Pair this with a glass of cold milk or a sharp espresso to cut through the richness of the cream.
Storage & Reheating
This cake lives in the freezer. Store it in the springform pan with the ring removed, wrapped tightly in plastic wrap to prevent freezer burn. It stays fresh for up to 2 months.
Regarding food safety, always follow FDA’s food safety tips when handling dairy products that soften at room temperature. Don't leave the cake out for more than two hours during a party.
For zero waste, if you have leftover Oreo crumbs or a bit of melted ice cream, stir them into a warm bowl of oatmeal or use them as a topping for a simple vanilla milkshake.
Make It Your Own
You can easily pivot this recipe to fit different flavor profiles without changing the chemistry.
For a Minty Twist
Swap the vanilla ice cream for mint chocolate chip. Add a drop of peppermint extract to the whipped cream for an extra punch.
For a Peanut Butter Punch
Fold in 1/2 cup of creamy peanut butter that has been slightly warmed. This adds a salty contrast to the sweet cocoa of the Oreos.
For a Vegan Version
Use a vegan butter substitute and a dairy-free vanilla ice cream. Replace the heavy cream with a chilled coconut cream (the thick part from the top of the can). The fat content in coconut cream is similar enough to maintain the structure.
Recipe FAQs
How to assemble this Oreo ice cream cake?
Press a butter cookie crumb mixture into a pan, fold whipped cream into softened vanilla ice cream with chopped Oreos, and freeze for six hours.
Tip: use a flat glass to pack the crust firmly for a stable base.
How long must the cake freeze before adding toppings?
Freeze the assembly for a minimum of six hours to ensure the structure is set.
Tip: warm the hot fudge slightly before spreading to make it glide over the frozen surface.
Is it true that the ice cream needs to be completely melted before mixing?
Actually, no. Let it sit at room temperature for 10 15 minutes until it is pliable but not melted.
Tip: use a rubber spatula to fold gently to maintain the airy volume of the whipped cream.
Where is the best place to store leftovers?
Keep the cake in the freezer wrapped tightly in plastic wrap for up to two months.
Tip: if you enjoyed the layering process here, see how the same logic works in our layered ice cream dessert.
Oreo No Bake Ice Cream Cake