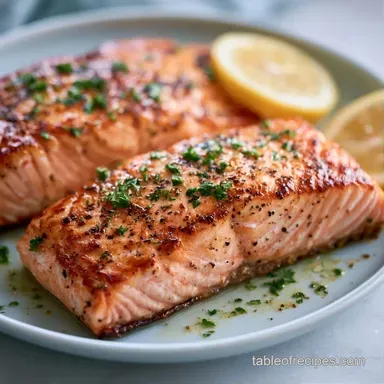
Olive Oil Seared Salmon: Crispy and Tender
- Time: 5 min active + 10 min cooking = 15 minutes total
- Flavor/Texture Hook: Shatter crisp skin with a velvety, tender center
- Perfect for: Busy weeknights when you want luxury without the effort
Seared Salmon
That first sizzle of the skin hitting the hot oil is the only sound I want to hear on a Tuesday. I remember the first time I actually got the skin to shatter like a cracker instead of sticking to the pan in a gummy, gray mess.
I had spent way too long overthinking the temperature, but the secret was actually just a few paper towels and some patience.
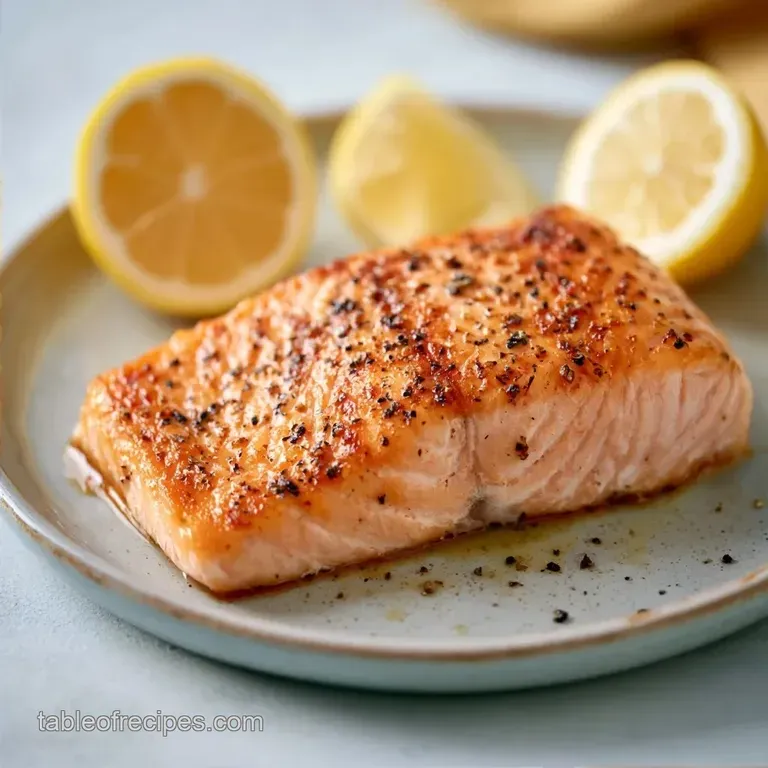
Right then, let's get into it. Most people overcook their fish because they're scared of the raw center, but we're aiming for that opaque, pale pink finish. This Olive Oil Seared Salmon is all about the contrast - the aggressive crunch of the skin against the buttery flakes of the fish.
Trust me on this, you don't need a fancy kitchen to make this work. As long as you have a heavy pan and some salt, you're set. We've stripped away the tedious steps to give you a reliable, low effort dinner that feels like a treat.
Why This Method Works
- Surface Dehydration: Removing moisture allows the skin to fry instead of steam, creating that shatter effect.
- Thermal Mass: Using a heavy pan keeps the temperature stable when the cold fish hits the oil.
- The Maillard Reaction: High heat triggers a chemical reaction between amino acids and reducing sugars, as explained by Serious Eats, creating the deep golden brown color.
- Pressure Contact: Pressing the fillets prevents the skin from curling, ensuring every millimeter touches the heat.
| Feature | Fast Method | Classic Poaching | Result |
|---|---|---|---|
| Time | 15 minutes | 30-40 minutes | Fast is quicker |
| Texture | Crispy/Velvety | Soft/Uniform | Fast has more contrast |
| Effort | Low | Medium | Fast is more efficient |
| Best For | Weeknights | Formal Brunch | Fast is better for daily use |
But what about the oil? Not all fats are created equal. We use olive oil here because it's a reliable thermal bridge, moving heat quickly from the metal to the protein.
Cooking Component Science
| Ingredient | Science Role | Pro Secret |
|---|---|---|
| Salmon Skin | Collagen Matrix | Dry it until it feels like parchment |
| Olive Oil | Heat Medium | Wait for the first wisp of smoke |
| Kosher Salt | Osmotic Agent | Season seconds before the pan |
| Lemon Juice | Acidic Balance | Squeeze at the very end to keep skin crisp |
Honestly, don't even bother with low-fat alternatives here. The fat is what carries the flavor and protects the fish from drying out during the sear.
Essential Shopping List
- 4 salmon fillets, 6 oz each, skin on Why this? Skin on is non negotiable for the crunch
- 2 tbsp extra virgin olive oil Why this? Provides a clean, over high heat sear
- 1 tsp kosher salt Why this? Larger grains prevent over salting
- 1/2 tsp black pepper Why this? Adds a subtle, earthy bite
- 1 lemon, halved Why this? Brightens the heavy fats
Ingredient Swaps:
| Original Ingredient | Substitute | Why It Works |
|---|---|---|
| Extra Virgin Olive Oil | Avocado Oil | Higher smoke point. Note: More neutral flavor |
| Kosher Salt | Sea Salt | Similar mineral profile. Note: Use slightly less as it's finer |
| Lemon | Lime | Similar acidity. Note: Adds a zesty, tropical note |
If you're looking for an even more basic approach, you can check out my Stovetop Salmon Fillet for a simpler version.
Required Minimal Tools
You don't need a professional kitchen for an Oil Seared Salmon. A cast iron or stainless steel skillet is the gold standard because they hold heat. Avoid non stick if you can, as they often can't handle the high heat needed for a true sear.
You'll also need a flexible spatula to flip the fish and a stack of paper towels to purge the moisture.
Chef Tip: Freeze your salmon fillets for 10 mins before searing. This tightens the skin and makes it less likely to curl.
Step-by-step Instructions

- Pat the salmon fillets completely dry with paper towels to remove surface moisture. Note: Damp skin equals soggy skin
- Season the fillets generously with salt and pepper immediately before cooking.
- Heat a cast iron or stainless steel skillet over medium high heat and add the olive oil, waiting until it shimmers and begins to wisps of smoke.
- Place fillets skin side down in the pan and press down lightly with a spatula for 30 seconds to ensure full skin to metal contact.
- Sear undisturbed for 4–5 minutes until the skin is deep golden brown and releases easily from the pan.
- Flip the fillets and cook for another 2–3 minutes until the sides turn from translucent pink to opaque, pale pink.
- Remove from heat immediately and squeeze fresh lemon juice over the top.
Precision Checkpoints:
- Pan Temp: Oil must shimmer and barely smoke before adding fish.
- First Side: Exactly 4-5 minutes for the skin to shatter.
- Second Side: 2-3 minutes for a medium rare to medium center.
Fixing Searing Problems
Skin is Sticking
This usually happens because the pan wasn't hot enough or the fish was moved too early. If you tug and it resists, leave it alone. The fish will naturally release once the proteins have browned.
Outside Burnt, Inside Raw
This is a sign of "aggressive" heat. If your pan is too hot, the outside chars before the heat can penetrate the center. Lower the heat slightly and use slightly thicker fillets.
| Problem | Root Cause | Solution |
|---|---|---|
| Gummy Skin | Surface moisture | Pat dry twice with paper towels |
| Curled Fillet | Muscle contraction | Press down with spatula for 30s |
| Dry Flesh | Overcooked | Pull 2 mins before "done" |
Common Mistakes Checklist:
- ✓ Did you pat the skin completely dry?
- ✓ Did you wait for the oil to shimmer?
- ✓ Did you avoid flipping the fish more than once?
- ✓ Did you season just before the pan?
Adjusting the Portion
When making a larger batch of Pan Seared Salmon Fillets, the biggest mistake is crowding the pan. If the fillets are touching, they'll steam instead of sear, and you'll lose that crunch. Work in batches of two if your skillet is small.
For a single fillet, reduce the oil to 1 tbsp and keep a close eye on the timing, as a smaller amount of fish can cause the pan temperature to fluctuate more.
| Budget Tier | Ingredient | Impact | Savings |
|---|---|---|---|
| Premium | Wild Sockeye | Richer flavor, leaner | $0 |
| Budget | Atlantic Farmed | Fattier, more forgiving | $3-5 per lb |
| Value | Frozen Fillets | Same taste if thawed right | $2-4 per lb |
Right then, once you've nailed the size, let's tackle some of the weird advice you see online.
Searing Myths
Myth: Searing "locks in the juices." Truth: Searing doesn't create a waterproof seal. Moisture loss happens regardless of the crust. The sear is purely for flavor and texture via the Maillard reaction.
Myth: You must use butter for the best flavor. Truth: Butter burns at a lower temperature than olive oil. Using butter alone often leads to black, burnt bits before the skin is actually crisp.
Storage and Waste Tips
Store any leftover Seared Salmon in an airtight container in the fridge for up to 2 days. To reheat, avoid the microwave, which makes the fish rubbery. Instead, pop it under a broiler for 2-3 minutes to crisp the skin back up.
For the freezer, wrap fillets tightly in foil and plastic; they'll last 2 months.
To avoid waste, don't toss your lemon halves. Squeeze every drop for the fish, then use the rinds to scrub your cutting board or zest them into a salad. According to USDA FoodData, lemon provides a great hit of Vitamin C and acidity that balances the omega-3 fats.
Best Salmon Pairings
This dish is quite rich, so you need something sharp or earthy to balance it. I love pairing this with my Potatoes in 36 Mins recipe for a full meal. A simple arugula salad with a balsamic glaze also works wonders.
If you're trying to master how to pan sear salmon for the first time, just remember: dry skin, hot oil, and no touching. Once you've got that down, you can experiment with glazes or different oils for an Easy Olive Oil Seared Salmon that'll impress anyone. Now, let's get that pan heating up!
Recipe FAQs
Is olive oil good for searing salmon?
Yes, it works well. Extra virgin olive oil provides a great flavor and handles the medium high heat required to achieve a golden crust.
How much olive oil should I use for searing?
Use 2 tablespoons. This is the ideal amount to coat the pan and ensure the fillets don't stick to the surface during the sear.
Should you brush salmon with olive oil before cooking?
No, put the oil directly in the pan. Adding oil to the skillet ensures the fish sears evenly; brushing the fillets can lead to uneven browning.
How do you cook salmon on the stovetop?
Pat fillets dry, season, and sear skin side down in a shimmering hot skillet for 4 5 minutes. Flip and cook for another 2 3 minutes until the flesh is opaque.
How do you cook salmon in the oven?
Roast on a sheet pan at a high temperature. If you prefer a hands off approach, see how we use similar techniques in our herb roasted salmon.
Is pan frying salmon in olive oil healthy?
Yes, it is a healthy method. Olive oil contains heart healthy fats that complement the omega-3s found naturally in salmon.
Is it true that surface moisture doesn't matter when searing salmon?
No, this is a common misconception. Damp skin creates steam, which prevents the skin from crisping and leads to a soggy texture.
Olive Oil Seared Salmon