Pan Fried Salmon: Crispy and Tender
- Time: 5 min active + 10 min cook = Total 15 minutes
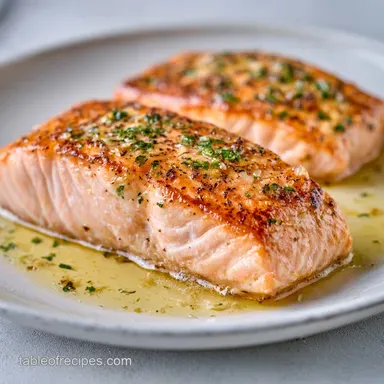
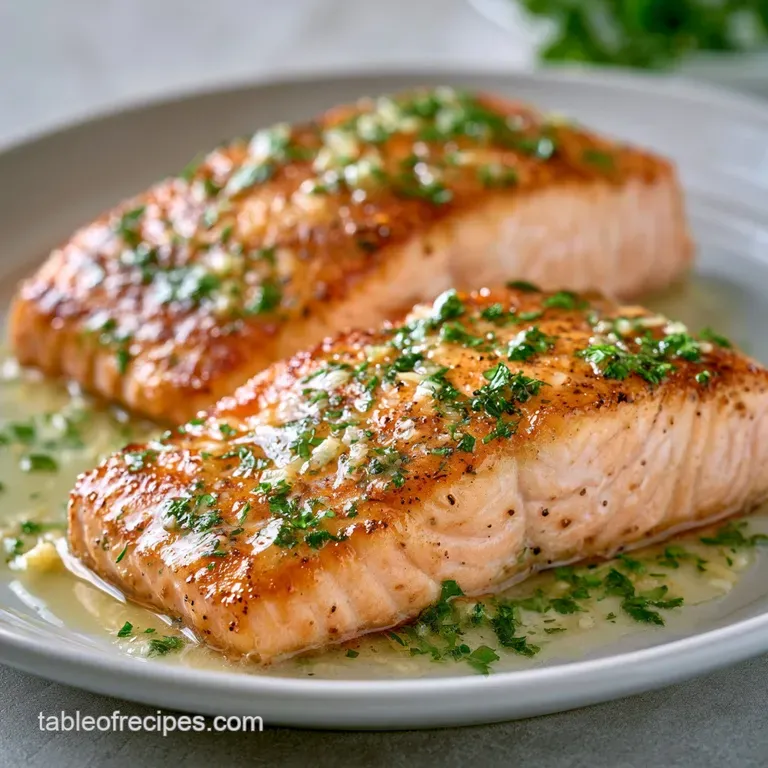
- Flavor/Texture Hook: Mahogany colored crispy skin with a velvety, tender center
- Perfect for: A high protein weeknight dinner that feels like a cheat meal
Crispy pan fried Salmon Guide
That first sizzle when the skin hits the hot oil is everything. It's that high pitched crackle that tells you the moisture is evaporating and the crust is forming. For a long time, I thought you needed a professional torch or some weird industrial equipment to get that thin, glass like skin you see in fancy bistros.
I spent way too many nights eating salmon that was either gummy or stuck to the pan like glue.
Then I realized the "secret" wasn't the heat, but the water. Most people just take the fish out of the package and toss it in the pan. That's a mistake. The moisture on the surface turns into steam, and steam is the enemy of a sear.
Once I started treating the surface of the fish like a piece of fine parchment, everything changed.
Now, this pan fried Salmon is my go to when I have exactly 15 minutes to get dinner on the table. It's efficient, it's low effort, and it tastes like you spent hours on it. You don't need to be a pro, you just need a heavy pan and a bit of patience during the first few minutes of searing.
The Core Techniques
Right then, let's talk about why this actually works. You don't need a degree in food science to get this right, just a few basic rules of thumb.
- Surface Dryness: Water creates steam, and steam prevents browning. By patting the fillets bone dry, you allow the oil to hit the protein directly.
- The Firm Press: Salmon skin tends to curl when it hits heat. Pressing it down for 10 seconds ensures every millimeter of skin makes contact with the pan.
- Temperature Gradient: Starting with oil and finishing with butter gives you the best of both worlds. The oil handles the over high heat sear, while the butter provides the velvety finish and nutty aroma.
- Carryover Heat: The fish keeps cooking after it leaves the pan. Taking it off at 125°F ensures it hits the ideal medium rare temperature on your plate.
| Method | Time | Texture | Best For |
|---|---|---|---|
| Stovetop | 15 mins | Shatter crisp skin | Speed & flavor |
| Oven Baked | 20 mins | Uniformly soft | Large crowds |
| Air Fryer | 12 mins | Dry crisp | Low oil diets |
The main difference here is the contact. A pan allows for that direct, intense heat that creates a crust, whereas an oven surrounds the fish in hot air, which is safer but leaves the skin limp.
Essential Ingredient List
I've kept this lean because we're after efficiency. No bland fillers here, just the stuff that makes the fish shine.
- Salmon Fillets (4 x 6 oz, skin on): Look for center cut fillets for even cooking. Why this? Skin on is mandatory for that crunch.
- Avocado Oil (1 tbsp): A high smoke point oil that won't burn. Why this? Keeps the pan from smoking out your kitchen.
- Kosher Salt (1 tsp): Coarser grains draw out surface moisture better. Why this? Better crust development.
- Cracked Black Pepper (½ tsp): Freshly cracked for a sharp bite. Why this? Cuts through the richness of the fish.
- Unsalted Butter (2 tbsp): For the final baste. Why this? Adds a nutty, velvety finish.
- Garlic (1 clove, smashed): Keep it whole to infuse the butter. Why this? Subtle aroma without burning.
- Fresh Lemon Juice (1 tbsp): Added at the very end. Why this? Brightens the heavy fats.
- Fresh Thyme (1 sprig): A classic pairing for buttery fish. Why this? Adds an earthy, woody note.
| Original Ingredient | Substitute | Why It Works |
|---|---|---|
| Avocado Oil | Grapeseed Oil | Similar high smoke point. Note: Neutral flavor profile. |
| Unsalted Butter | Ghee | Higher heat tolerance. Note: Slightly nuttier, less creamy. |
| Fresh Thyme | Dried Thyme | Concentrated flavor. Note: Use 1/3 amount; less aromatic. |
| Lemon Juice | Lime Juice | Similar acidity. Note: Adds a slightly tropical zest. |
If you're looking for another way to use your salmon, you can check out this Sheet Pan Herb Roasted Salmon for those days when you don't want to stand over the stove.
Component Analysis
Before we start, let's look at what each part is actually doing in the pan. This isn't about chemistry, just about how the food behaves.
| Ingredient | Role | Pro Secret |
|---|---|---|
| Salmon Skin | Texture | Keep it dry to avoid sticking. |
| Avocado Oil | Heat Transfer | Heat until it shimmers, not smokes. |
| Butter | Flavor Carrier | Baste only in the last 3 minutes. |
| Lemon Juice | Balance | Add after heat is off to keep it fresh. |
Needed Kitchen Tools
You don't need a full professional kit, but the pan choice matters. If you use a thin pan, you'll get hot spots and uneven cooking.
- 12 inch Cast Iron Skillet: The gold standard for heat retention.
- Heavy bottomed Non stick Pan: A great alternative if you're worried about sticking.
- Fish Spatula: A thin, flexible metal spatula is best for getting under the skin.
- Paper Towels: You'll use more than you think for drying the fish.
- Instant read Thermometer: The only way to guarantee you don't overcook it.
Step by step Process

This is where we execute. Follow the timeline strictly for the best results. We're dividing this into the prep, the sear, and the finish.
Prep Flow Phase
- Pat the salmon fillets thoroughly with paper towels on all sides to remove surface moisture. Note: This is the most important step for a crust.
- Season generously with salt and pepper immediately before cooking. Note: Salting too early draws out water and makes the skin soggy.
The Searing Phase
- Heat avocado oil in a 12 inch cast iron skillet or heavy bottomed non stick pan over medium high heat until the oil shimmers.
- Place the fillets skin side down in the pan.
- Press firmly with a spatula for 10 seconds to ensure total skin to pan contact.
- Cook undisturbed for 5-6 minutes until the skin is mahogany colored and releases easily from the pan.
The Basting Phase
- Flip the fillets carefully.
- Immediately add the unsalted butter, smashed garlic, and fresh thyme to the pan.
- As the butter foams, tilt the pan and spoon the hot butter over the crispy skin for 2-3 minutes.
- Remove from heat when the internal temperature reaches 125°F (52°C) for medium rare. Note: The temperature will rise a few degrees while resting.
Chef's Note: If you see the butter turning dark brown too quickly, turn the heat down slightly. We want a golden brown nutty butter, not a burnt one.
Fixing Common Failures
Even the best of us have days where the fish sticks or the center stays raw. Here is how to handle it.
Stop The Sticking
If your pan fried Salmon is clinging to the pan, you likely flipped it too early. The skin will naturally release itself once the proteins have dehydrated and browned. Be patient.
Avoid Rubbery Fish
Overcooked salmon becomes chalky and rubbery. This usually happens because people ignore carryover cooking. According to guidelines on Serious Eats, resting meat allows the juices to redistribute, and the internal temp will climb. Pull it at 125°F.
Fix Soggy Skin
Soggy skin is usually the result of overcrowding the pan. When you put too many fillets in at once, the pan temperature drops and the fish releases moisture that can't evaporate. Work in batches if you have a small pan.
| Problem | Root Cause | Solution |
|---|---|---|
| Skin tears on flip | Flipped too early | Wait until it releases naturally. |
| Grey, steamed fish | Pan wasn't hot enough | Heat oil until it shimmers. |
| Burnt garlic | Added butter too early | Add butter only after flipping. |
Common Mistakes Checklist
- ✓ Did you pat the skin completely dry?
- ✓ Did you press the fish down for 10 seconds?
- ✓ Did you wait 5-6 minutes before the first flip?
- ✓ Did you check the internal temp at 125°F?
- ✓ Did you avoid overcrowding the skillet?
Tasty Flavor Twists
Once you've nailed the basic pan fried Salmon, you can start playing with the basting liquids. The butter is just a vehicle for flavor.
Sweet Glaze Option
Swap the thyme for a teaspoon of honey and a splash of soy sauce during the basting phase. This creates a sticky, savory lacquer that is a huge hit with kids.
Mediterranean Style
Replace the garlic with a pinch of dried oregano and add a few capers to the butter at the end. This pairs beautifully with Potato Cakes for a full meal.
Healthy Swap
If you want a lighter version, skip the butter baste entirely. Use a tablespoon of extra virgin olive oil and finish with a heavy squeeze of lemon and fresh parsley.
Scaling Your Batch
Cooking for two is easy, but cooking for eight requires a different strategy.
Scaling Down (1-2 fillets): Use a smaller 8 inch pan. Because there is less mass in the pan, it will heat up faster. Reduce your searing time by about 20% and keep a very close eye on the internal temperature.
Scaling Up (5-8 fillets): Do not try to cram them all in one pan. Work in batches. If you overcrowd, you'll end up with steamed fish instead of a sear. For the butter baste, use a separate small skillet to warm your butter and aromatics, then pour it over the fillets in the main pan.
The Pro Volume Strategy: If you're hosting a party and don't want to stand at the stove, you can sear the skin side in the pan for 5 minutes, then move the whole skillet into a 400°F oven for 3-4 minutes to finish. This ensures every piece is cooked evenly.
If you're tired of fish and want something hearty for a crowd, maybe try my Mushroom Swiss Burger Recipe next time.
Debunking Fish Myths
There are a lot of "rules" about fish that are actually just noise. Let's clear a few things up.
Myth: Searing seals in the juices. This is a classic kitchen lie. Searing doesn't create a waterproof seal; moisture loss happens throughout the entire cooking process. Searing is about flavor and texture, not about "locking in" water.
Myth: Fish must be room temperature before cooking. While some people swear by this, it's not necessary for salmon. In fact, keeping the fish cold can actually help you get a better sear on the skin without overcooking the center.
Myth: You can tell doneness by the color of the flesh. Salmon varies in color from pale pink to deep orange. Relying on color is a gamble. Use a thermometer.
Storage And Freshness
Salmon doesn't keep forever, so plan your meals accordingly.
Fridge Guidelines: Store cooked pan fried Salmon in an airtight container for up to 3 days. Be aware that the skin will lose its "shatter" and become soft in the fridge.
Freezer Tips: I don't recommend freezing cooked salmon, as the texture becomes grainy. However, you can freeze raw fillets for up to 3 months. Thaw them slowly in the fridge overnight to maintain the cell structure.
Zero Waste Secrets: Don't toss the salmon scraps or the skin if you trim any off. Throw them in a freezer bag with some onion skins and celery ends. When the bag is full, simmer them with water and a bay leaf to make a rich, omega-3 packed fish stock for chowders.
Best Side Pairings
Since this dish is rich and buttery, you need sides that provide contrast. Think acid, crunch, or bitterness.
- Bright Greens: Sautéed spinach with garlic or roasted asparagus with a squeeze of lemon.
- Starchy Balance: A wild rice pilaf or a light quinoa salad with cucumber and feta.
- Fresh Salads: An arugula salad with a sharp lemon vinaigrette to cut through the fat of the fish.
- Classic Comfort: Garlic mashed potatoes or a simple corn puree.
Right then, you've got everything you need. Just remember: dry skin, hot oil, and don't flip too early. Your pan fried Salmon will be the highlight of the week. Let's get cooking!
Recipe FAQs
How do you cook salmon on the stovetop?
Heat avocado oil in a cast iron skillet over medium high heat. Sear the fillets skin side down for 5-6 minutes, then flip and baste with butter, garlic, and thyme for 2-3 minutes until the internal temperature reaches 125°F.
What is the best way to get crispy salmon skin?
Pat the fillets thoroughly dry with paper towels on all sides. Once in the pan, press firmly with a spatula for 10 seconds to ensure total skin-to-pan contact.
How do you cook salmon for a diabetic?
Use the provided ingredients of avocado oil and butter. These healthy fats, combined with the absence of added sugars or glazes, keep the meal blood sugar friendly.
Is it true that salmon must be cooked until it is completely opaque throughout?
No, this is a common misconception. Removing the fillets at an internal temperature of 125°F (52°C) ensures a medium rare finish that remains moist and tender.
What's an easy and delicious way to prepare salmon?
Season with salt and pepper and sear in a heavy bottomed pan. If you enjoyed mastering the temperature control for a perfect sear here, see how the same principle works in our homemade pancakes to achieve a golden brown finish.
Can you freeze cooked salmon?
No, I don't recommend it. The texture becomes grainy once thawed. It is better to freeze raw fillets and thaw them slowly in the fridge overnight.
How to cook salmon for someone with gastritis?
Reduce the amount of black pepper and garlic used in the pan. Focus on a gentle sear with avocado oil and a small amount of lemon juice to keep the dish easier on the stomach.
pan fried Salmon