Crispy Skin Salmon Recipe: Pan-Seared
- Time: 7 min active + 10 min cook = Total 20 mins
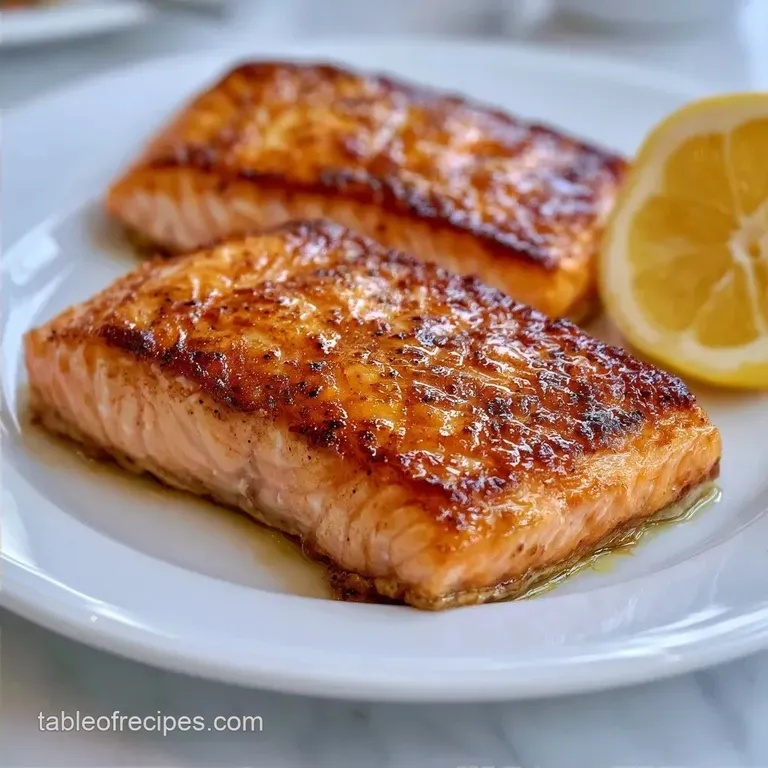
- Flavor/Texture Hook: Shattering skin with a velvety, medium rare center
- Perfect for: High protein weeknight dinners for busy professionals
- The Best Crispy Skin Salmon Recipe
- From Soggy to Shattering
- Common Searing Blunders
- Quick Specs and Timing
- The Essential Ingredients
- Minimalist Tool List
- Step-by-Step Searing Guide
- Fixing Searing Issues
- Troubleshooting Common Issues
- Tweak and Swap Options
- Truths About Searing
- Saving and Warming Leftovers
- Ideal Side Dish Pairings
- Recipe FAQs
- 📝 Recipe Card
The Best Crispy Skin Salmon Recipe
That aggressive sizzle is the only sound you want to hear when the fish hits the pan. I remember the first time I actually got it right, I didn't even want to eat it for a second because the skin looked like a golden potato chip.
For the longest time, I was just getting this rubbery, grey skin that peeled off in one sad piece, which is honestly such a waste of the best part of the fish.
The secret isn't some fancy equipment or a chef's degree, it's just about being ruthless with a paper towel. If there is even a hint of moisture on that skin, you're just steaming your dinner. This Crispy Skin Salmon Recipe is all about efficiency, high heat, and a little bit of patience while the fish does its thing.
You can expect a result that looks like it came from a high end bistro but takes almost zero effort once you have the fillets prepped. We're talking about a contrast in textures that is honestly addictive, and since it only takes 10 minutes of actual cooking, it's the ultimate win for anyone who is tired of bland, overcooked fish after a long work day.
From Soggy to Shattering
The difference between a mediocre piece of fish and this result is entirely in the surface tension. When I first started cooking, I thought "searing" was just about high heat. I'd throw the salmon in a hot pan and wonder why it stuck or why the skin stayed soft. I realized that moisture is the enemy of the crunch.
Once I started patting the skin bone dry, the transformation was immediate. The skin doesn't just brown, it actually separates from the flesh and becomes a thin, crisp layer. It's a total shift in the eating experience.
Instead of the skin being an afterthought you leave on the plate, it becomes the highlight of the dish.
This approach is all about the "quick win." You don't need to brine the fish for hours or use a vacuum sealer. Just a few minutes of prep and the right heat management, and you've got a meal that feels like a treat without the tedious cleanup.
Common Searing Blunders
Most people fail at this because they are too timid with the heat. They use a medium flame, the oil doesn't get hot enough, and the fish just simmers in its own juices. I've been there, and it's a disaster. You need that oil shimmering, almost at the point of smoking, before the fish even touches the metal.
Another huge mistake is moving the fish too early. There is a natural "release" that happens when the proteins have cooked enough to detach from the pan. If you try to flip it too soon, you'll literally rip the skin off the fillet. It's frustrating, but the fix is simple: just leave it alone.
Finally, seasoning the skin side with salt too early can be a trap. Salt draws out moisture. If you salt the skin and let it sit for ten minutes, you've just created a layer of brine that prevents the skin from ever getting truly crisp. Always season the flesh side and keep the skin pristine until the last second.
Quick Specs and Timing
To get this right, you need to hit a few specific marks. This isn't a "guess and check" kind of meal if you want that specific shatter.
- Pan Temp
- Avocado oil must shimmer and just start to smoke (approx 400°F/200°C).
- Internal Temp
- Pull the fish at 125°F (52°C) for a medium rare finish.
- Rest Time
- Exactly 3 minutes to allow juices to redistribute.
Method Comparison:
| Method | Time | Texture | Best For |
|---|---|---|---|
| Stovetop | 10 mins | Shattering skin, moist center | Quick weeknight wins |
| Oven | 15-20 mins | Evenly cooked, softer skin | Large batches/groups |
The Essential Ingredients
I keep this list minimal because the quality of the salmon should do the heavy lifting. Don't overcomplicate this with heavy rubs or marinades that will just burn in the pan.
- 2 salmon fillets, skin on (approx. 6 oz / 170g each) Why this? Skin on is non negotiable for the texture.
- 1 tbsp avocado oil Why this? High smoke point prevents bitter burnt oil.
- 1/2 tsp kosher salt Why this? Coarse grains provide better surface seasoning.
- 1/4 tsp black pepper Why this? Simple heat to balance the richness.
- 1 tbsp unsalted butter Why this? Adds a velvety finish and nutty flavor.
- 1/2 lemon Why this? Acid cuts through the fatty oils of the fish.
Substitution Options:
| Original Ingredient | Substitute | Why It Works |
|---|---|---|
| Avocado Oil (1 tbsp) | Grapeseed Oil (1 tbsp) | Similar high smoke point. Note: Neutral flavor, won't affect the fish. |
| Unsalted Butter (1 tbsp) | Ghee (1 tbsp) | Higher smoke point than butter. Note: Lacks the slight milky sweetness. |
| Kosher Salt (1/2 tsp) | Sea Salt (1/2 tsp) | Same salinity. Note: Use slightly less if using fine table salt. |
Minimalist Tool List
You don't need a kitchen full of gadgets for this. In fact, using too many pans just means more dishes.
- Cast Iron Skillet: This is the gold standard. It holds heat better than any other pan, ensuring the skin doesn't drop in temperature when the fish hits. If you don't have one, a heavy stainless steel pan works, but avoid non stick if you want a truly professional sear.
- Fish Spatula: A thin, flexible metal spatula is key for getting under that skin without tearing it.
- Paper Towels: The most important tool in the kitchen for this recipe.
- Meat Thermometer: An instant read probe is the only way to guarantee you don't overcook the center.
Step-by-step Searing Guide

Right then, let's crack on with the actual cooking. Keep your ingredients close so you aren't scrambling while the pan is screaming hot.
- Dry the fillets. Use paper towels to pat the salmon bone dry. Note: This is the most critical step for a Crispy Skin Salmon Recipe.
- Season the flesh. Sprinkle salt and pepper only on the top side. Leave the skin completely clean.
- Heat the oil. Pour avocado oil into the skillet over medium high heat until it shimmers and just begins to smoke.
- Sear the skin. Place fillets skin side down. Immediately press down firmly with a spatula for 30 seconds. Note: This prevents the skin from curling.
- Patient cook. Leave the salmon undisturbed for 5-7 minutes until the skin is golden and releases easily from the pan.
- The Flip. Carefully flip the fillets to the flesh side.
- Butter Baste. Add the unsalted butter. Once it's foaming, spoon it over the skin for 1-2 minutes.
- Final Temp. Remove from heat when the internal temperature hits 125°F (52°C).
- The Rest. Let the fish rest for 3 minutes on a plate.
- Finish. Squeeze fresh lemon juice over the top right before serving.
Fixing Searing Issues
Even if you follow the steps, sometimes the fish has a mind of its own. Most issues come down to heat management or moisture.
Troubleshooting Common Issues
| Issue | Solution |
|---|---|
| Skin sticking to the pan | Usually, this means the pan wasn't hot enough or you tried to flip it too soon. When the skin is properly seared, it naturally detaches. If it's sticking, give it another 30-60 seconds. |
| Why did my salmon skin curl up | Salmon fillets tend to contract when they hit high heat, which causes the edges to lift. This is why the "press" in step 4 is so important. |
| Why is the skin burnt but the fish raw | Your heat was likely too high, or your fillets were too thin. According to guides on Serious Eats, controlling the heat during the final stages is key. |
Common Mistakes Checklist:
- ✓ Seasoning the skin side (causes moisture release)
- ✓ Flipping the fish more than once (tears the crust)
- ✓ Using olive oil with a low smoke point (burns and tastes bitter)
- ✓ Skipping the resting period (juices leak out, making skin soggy)
- ✓ Not pressing the fish down (uneven contact)
Tweak and Swap Options
Once you've nailed the base Crispy Skin Salmon Recipe, you can play around with the flavors. I love adding a pinch of smoked paprika to the flesh side for a bit of depth. If you're feeling fancy, swap the butter for a knob of compound butter mixed with garlic and parsley.
If you want a different protein, this technique works surprisingly well with trout or Arctic char. Just keep in mind that trout is thinner, so you'll need to reduce the skin side sear time by about a minute.
For those who want a lighter version, you can skip the butter baste and use a splash of white wine to deglaze the pan at the end. This gives you a light pan sauce that doesn't feel as heavy. For a complete meal, this pairs perfectly with my Parmesan Potatoes for a total comfort food vibe.
Adjustment Guidelines:
- Scaling Down (1 fillet): Use a smaller pan to keep the oil depth consistent. Reduce total cook time by about 10% as the pan stays hotter with less fish.
- Scaling Up (4+ fillets): Work in batches. If you crowd the pan, the temperature drops, and you'll end up steaming the fish. Salt and spices should only be increased to 1.5x the original ratio to avoid over salting.
Truths About Searing
There are a few things people tell you about cooking fish that are just plain wrong. Let's set the record straight.
First, the idea that searing "seals in the juices" is a total myth. Searing creates flavor and texture, but it doesn't create a waterproof barrier. Moisture loss happens regardless of how you sear it, which is why using a thermometer is so much more important than "sealing" the meat.
Second, some people think you need to "score" the skin with a knife to make it crispy. Honestly, don't even bother. If you dry the skin properly and use a heavy pan, you don't need to cut into the fish. Scoring often just lets the fats leak out too quickly, which can actually make the skin less crisp.
Saving and Warming Leftovers
Salmon is one of those things that can go south quickly if you reheat it wrong. If you put it in the microwave, you'll lose that shattering skin and end up with something that smells like a locker room.
Storage Guidelines:Fridge: Store in an airtight container for up to 3 days. Freezer: I don't recommend freezing cooked salmon, as the texture becomes mealy.
Reheating for Crunch: The only way to bring back the crisp is using an air fryer or a toaster oven. Put the fillet in at 350°F (180°C) for 3-5 minutes, skin side up. This renders the fat again and restores that crunch without overcooking the center.
Zero Waste Tips: Don't toss the lemon halves! Squeeze the remaining juice into a salad or use the zest to brighten up some Mediterranean Grain Bowls. If you have any salmon scraps from trimming the fillets, chop them up and mix them with a bit of mayo and capers for a quick salmon salad.
Ideal Side Dish Pairings
Since the salmon is rich and buttery, you need something with a bit of a bite or a fresh contrast. A simple arugula salad with a sharp lemon vinaigrette is the classic choice because it mirrors the lemon we used in the pan.
If you want something heartier, steamed asparagus or sautéed spinach works brilliantly. The earthiness of the greens balances the fattiness of the fish. I also love serving this over a bed of quinoa or farro to soak up that leftover lemon butter from the pan.
For those who love a bit of indulgence, a side of creamy polenta or a cauliflower puree provides a velvety base that contrasts the shatter of the skin. Just keep the sides simple so you don't distract from the star of the show.
Recipe FAQs
How to get crispy skin in salmon?
Pat the fillets bone dry with paper towels before they hit the pan. Moisture is the enemy of crispiness and will cause the skin to steam rather than sear.
How do you cook salmon on the stovetop?
Sear the skin side down in shimmering avocado oil over medium high heat. Press firmly for 30 seconds, cook undisturbed for 5-7 minutes, flip, and baste with butter for 1-2 minutes.
How to cook salmon in the oven?
Roast the fillets on a lined tray at a high temperature for a hands off approach. If you want a full meal in one go, try this sheet pan method.
Can you eat salmon skin while pregnant?
Yes, as long as it is fully cooked. Well seared salmon skin is safe and provides healthy omega-3 fatty acids.
Why does the salmon skin curl up during searing?
Muscle fibers contract when exposed to high heat. Pressing the fillets down firmly with a spatula for the first 30 seconds ensures uniform contact and prevents the edges from lifting.
Is it true that seasoning the skin helps it get crispier?
No, this is a common misconception. You should season only the flesh side; leaving the skin pristine prevents moisture buildup that can hinder the searing process.
How to know when the salmon is perfectly cooked?
Use a meat thermometer to hit 125°F (52°C). This temperature ensures a perfect medium rare result after the fillets rest for 3 minutes.
Crispy Skin Salmon Recipe