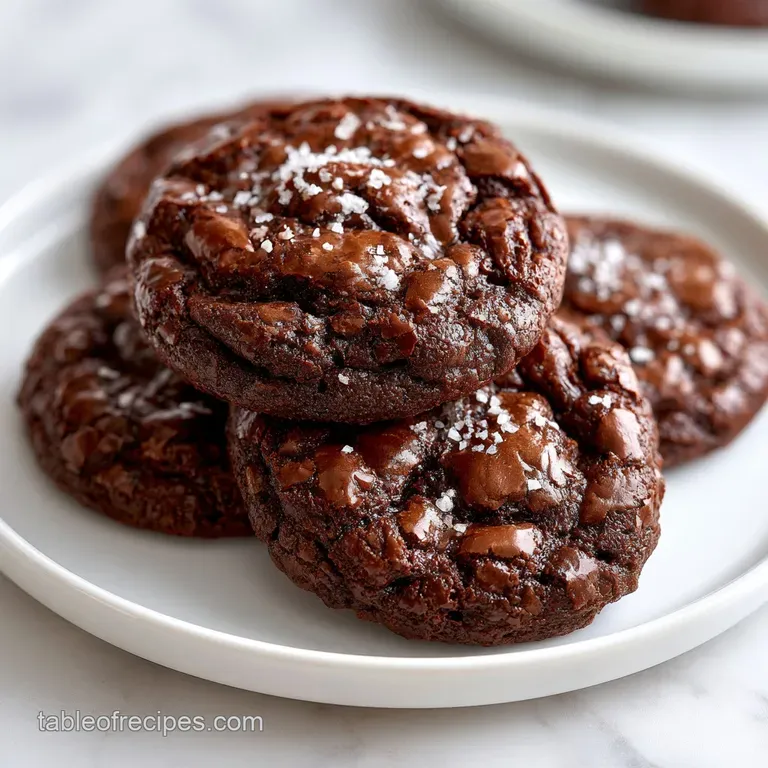
Cookies Made from Brownie Mix: Fudgy and Dense
- Time: 10 min active + 10 min baking = Total 20 mins
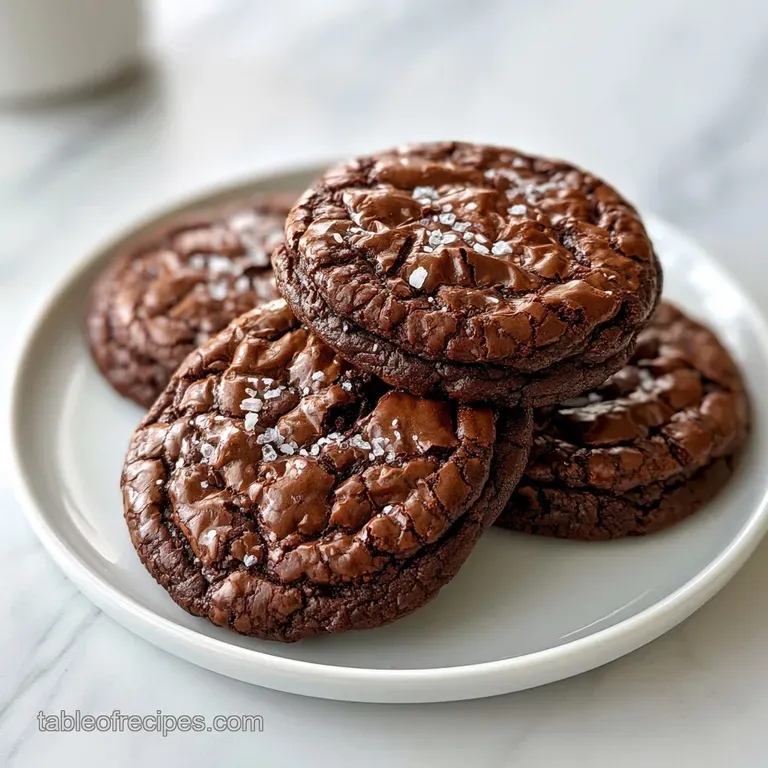
- Flavor/Texture Hook: Fudgy, dense center with a shatter crisp crinkle top
- Perfect for: Last minute cravings or easy party platters
- Cookies Made From Brownie Mix
- The Truth About Brownie Cookies
- Essential Ratios and Timing
- Breaking Down the Components
- Necessary Kitchen Tools
- Precise Steps for Baking
- Solving Common Baking Issues
- Swaps and Texture Tweaks
- Scaling Guidelines
- Preservation Secrets
- Best Ways to Serve
- Recipe FAQs
- 📝 Recipe Card
The first time I tried to "hack" a brownie mix into cookies, I thought I could just eyeball the extra ingredients. I added one egg and some random flour, and the result was a disaster.
The batter was too wet, and as soon as they hit the oven, they melted into one giant, sticky chocolate lake that covered the entire baking sheet. It was a total mess.
That failure taught me that you can't just treat brownie batter like cookie dough. Brownies are designed to be stable in a pan, but cookies need their own structural integrity to hold a rounded shape.
I realized the secret is in the precision of the extra flour and the specific way the powdered sugar interacts with the surface during the bake.
Once I dialed in the ratios, I found a way to get that velvety, dense center while maintaining a professional looking crinkle. This isn't about guesswork; it's about adjusting the chemistry of a pre made mix to behave like a standalone cookie.
You'll get a treat that tastes like a gourmet bakery item but takes a fraction of the effort.
Cookies Made From Brownie Mix
Right then, let's get into the mechanics. To get these right, you need to understand that we are essentially increasing the viscosity of the batter. A standard brownie mix is too fluid for a cookie; adding all purpose flour provides the gluten network needed to trap air and hold the shape, while the powdered sugar creates that iconic cracked appearance.
If you're looking for other low effort treats, you might enjoy 3 ingredient peanut butter cookies, which rely on a completely different structural base. But for these, we're aiming for a rich, chocolate heavy profile that mimics a fudgy brownie but eats like a cookie.
The goal here is the "under bake." If you wait until the center looks done, you've gone too far. You want the edges to be matte and set, but the middle should still look slightly wet. The residual heat from the pan will finish the job, ensuring the center stays fudgy rather than turning into a dry cake.
The Truth About Brownie Cookies
Most people think any brownie mix will work if you just add an egg. But without the extra flour, the fat content in the mix dominates, causing the cookies to spread thin. The result is more of a "chocolate wafer" than a brownie cookie.
By introducing a specific amount of all purpose flour, we create a barrier that slows down the spread.
Another common mistake is skipping the powdered sugar. While it seems like a garnish, it's actually functional. The sugar draws moisture from the surface of the dough, creating a thin, crisp shell that shatters when you bite into it.
This contrast between the crisp top and the velvety center is what makes this recipe work.
Finally, don't overlook the salt. Most box mixes are quite sweet, but they often lack the depth of a scratch made brownie. A pinch of sea salt cuts through the sugar and enhances the cocoa notes, making the final product taste more complex and less like a processed snack.
Essential Ratios and Timing
When working with a pre made mix, precision is your best friend. Because we aren't measuring the cocoa or sugar individually, the additions we make have a disproportionate effect on the final texture.
Precision Checkpoints:
- Oven Temp: Must be exactly 350°F (175°C) to ensure the crinkle forms before the center collapses.
- Mixing Time: Exactly 60 seconds after adding wet ingredients to ensure a glossy emulsion without overworking the gluten.
- Bake Window: 8-10 minutes. Even 60 seconds of over baking can move the texture from "fudgy" to "cakey."
| Method | Total Time | Effort Level | Texture Consistency |
|---|---|---|---|
| This Hack | 20 mins | Very Low | Standardized |
| From Scratch | 60+ mins | High | Variable |
Decision Shortcut:
- Want them fudgier? Pull them out at exactly 8 minutes.
- Want them chewier? Add an extra tablespoon of flour.
- Want a deeper crinkle? Roll them in powdered sugar twice.
Breaking Down the Components
The chemistry here is all about moisture control. The brownie mix provides the bulk of the sugar and cocoa, but the added components refine the structure. According to guidelines from King Arthur Baking, the protein content in all purpose flour is crucial for providing the "skeleton" of the cookie.
- Structure Boost
- Added flour increases the solids to liquid ratio, preventing the cookies from flattening.
- Surface Tension
- Powdered sugar is hygroscopic, meaning it absorbs moisture from the dough, which creates the distinct cracked surface.
- Fat Emulsion
- Vegetable oil provides a consistent, moist crumb that doesn't harden as quickly as butter in the fridge.
- Binding Power
- Eggs provide the lecithin needed to bond the fats and liquids into a smooth batter.
| Ingredient | Science Role | Pro Secret |
|---|---|---|
| Brownie Mix | Flavor Base | Use a high cocoa brand for a darker color |
| AP Flour | Structural Support | Sift it first to avoid white clumps |
| Powdered Sugar | Surface Texture | Coat heavily for a better "shatter" |
| Vegetable Oil | Moisture Retention | Use a neutral oil to let chocolate shine |
Necessary Kitchen Tools
You don't need a professional bakery setup, but a few specific tools make the process smoother. A large mixing bowl is a given, but a silicone mat or parchment paper is non negotiable. These cookies have a high sugar content, and without a barrier, they will fuse to your pan.
A cookie scoop (about 1.5 inches) is highly recommended. This ensures every cookie is the same size, which means they all finish baking at the exact same time. If you use a spoon, you'll likely end up with some that are burnt and some that are raw.
Finally,, a wire cooling rack is essential. If you leave the cookies on the hot pan for too long, they will continue to cook from the bottom up, drying out that fudgy center we worked so hard to protect.
Precise Steps for Baking
- Preheat your oven to 350°F (175°C). Note: Let the oven fully preheat so the cookies set immediately.
- In a large mixing bowl, combine the brownie mix and all purpose flour first to ensure there are no clumps.
- Add the eggs and vegetable oil to the dry ingredients. Mix on medium speed for approximately 60 seconds until the batter is glossy and smooth.
- Line a baking sheet with parchment paper or a silicone mat.
- Scoop rounded tablespoons of dough (about 1.5 inches in diameter) and place them 2 inches apart on the baking sheet.
- If desired, roll each dough ball in powdered sugar until heavily coated for a crinkle effect.
- Bake for 8 to 10 minutes until the edges are set and matte but the centers still look slightly soft and wet.
- Let the cookies cool on the baking pan for 5 minutes to firm up before transferring them to a wire rack to cool completely.
Solving Common Baking Issues
The most common frustration with these cookies is the "spread." If your cookies look like pancakes, it's usually a temperature issue. If the oven isn't hot enough, the fat melts before the flour has a chance to set the structure. This is why preheating is critical.
Another issue is the texture. If they feel too cakey, you might have over mixed the batter. Over mixing develops too much gluten, which traps air and gives the cookie a bread like consistency instead of a dense, fudgy one. Stick to the 60 second rule.
For those wondering about the "crinkle" effect, Serious Eats notes that the interaction between the sugar and the heat creates that distinctive skin. If your cookies aren't cracking, you might not have used enough powdered sugar, or your oven temp is too low.
| Problem | Root Cause | Solution |
|---|---|---|
| Excessive Spreading | Oven too cool or too much oil | Check oven temp with a thermometer |
| Cakey Texture | Over mixing or too much flour | Mix for exactly 60 seconds |
| Sticking to Pan | Lack of parchment/silicone | Always use a non stick liner |
Common Mistakes Checklist:
- ✓ Avoid using cold eggs; let them reach room temperature for better emulsion.
- ✓ Do not press the dough balls down; let them rise naturally.
- ✓ Never bake longer than 10 minutes, even if they look "underdone."
- ✓ Ensure the powdered sugar coating is thick, not just a light dusting.
- ✓ Use a neutral oil, not extra virgin olive oil, to avoid a savory aftertaste.
Swaps and Texture Tweaks
While the standard recipe is a winner, you can adjust it based on what's in your pantry. If you don't have vegetable oil, melted butter is a great alternative, though it will make the cookie slightly denser and more "buttery."
For those avoiding gluten, you can use a 1:1 gluten-free flour blend. Just keep in mind that GF flours often absorb more liquid, so you might need to add a teaspoon of milk if the batter feels too stiff.
| Original Ingredient | Substitute | Why It Works |
|---|---|---|
| Vegetable Oil | Melted Butter | Similar fat content. Note: Adds a richer flavor but firmer texture |
| AP Flour | GF 1:1 Flour | Provides structure. Note: May require a tiny bit more moisture |
| Powdered Sugar | Granulated Sugar | Adds sweetness. Note: Will lose the crinkle effect and be crispier |
If you're feeling adventurous, try adding a handful of chocolate chips or crushed walnuts to the batter. Just be careful not to over mix after adding the inclusions. For a more colorful treat, you can use "Cosmic" style candy coated chocolates to give them that nostalgic look.
Scaling Guidelines
When you need to make a larger batch, remember that baking is chemistry. You can't just double everything and expect the same result.
Scaling Down (Half Batch): Use a smaller baking sheet to maintain heat distribution. Reduce the baking time by about 20%, and since you can't easily use half an egg, beat one egg in a small bowl and measure out 2 tablespoons.
Scaling Up (Double Batch): Work in batches rather than crowding one giant tray. If you're baking multiple sheets at once, lower the oven temperature by 25°F and extend the bake time by 2-3 minutes to account for the heat loss when opening the door.
Only increase the salt to 1.5x rather than 2x to avoid over salting.
Preservation Secrets
To keep these cookies from drying out, storage is key. Because of the high fat and sugar content, they stay moist longer than a standard sugar cookie. Store them in an airtight container at room temperature for up to 4 days.
For longer storage, the freezer is your best bet. Flash freeze the cookies on a tray for 1 hour before transferring them to a freezer bag. This prevents them from sticking together. They'll stay fresh for up to 3 months.
To reheat, don't use a microwave, as that can make them rubbery. Instead, pop them in a 300°F oven for 3-5 minutes. This restores the shatter crisp exterior while melting the center back into a velvety state.
As for zero waste, if you have leftover powdered sugar, don't toss it. Use it to make a simple glaze for other treats. If you have a bit of batter left over, you can bake it as one single "mega cookie" in a ramekin for a personal dessert.
Best Ways to Serve
These cookies are rich, so they pair best with something acidic or bitter to balance the sugar. A cold glass of almond milk or a strong espresso is the classic choice. The bitterness of the coffee cuts right through the dense chocolate.
If you're hosting a party, try creating a dessert platter. These cookies made from brownie mix pair beautifully with a serving of Classic homemade apple crisp, offering a great contrast between the deep chocolate and the tart, spiced apples.
For a more decadent experience, serve a warm cookie topped with a scoop of vanilla bean ice cream and a drizzle of salted caramel. The temperature contrast between the warm, fudgy cookie and the freezing ice cream is a total win.
Recipe FAQs
Can I make cookies from a brownie mix?
Yes. Adding a small amount of all-purpose flour transforms the fluid brownie batter into a stable cookie dough that holds its shape.
Can a diabetic eat these brownie cookies?
No, these are generally not recommended. The high sugar content in the pre-made mix and powdered sugar can lead to significant blood glucose spikes.
Why are my brownie cookies too flat?
The flour ratio is likely too low. Without the extra all-purpose flour, the batter lacks the structural integrity to resist spreading into a puddle in the oven.
What are some common brownie cookie mistakes?
Overbaking is the most common error. Pull them out when the edges are matte but the centers still look slightly wet to ensure a fudgy interior.
How to get the signature crinkle top?
Roll each dough ball in powdered sugar until heavily coated. This creates a sugar crust that cracks as the cookie expands during baking.
Is it true that you can use just the brownie mix alone to make cookies?
No, this is a common misconception. Standard mixes are designed for pans; without added flour, they will melt into one large sheet on a baking tray.
How to store these cookies for freshness?
Place them in an airtight container at room temperature. If you enjoyed the speed of this recipe, try our peanut butter cookies for another fast treat.
Cookies Made From Brownie Mix

